In this tutorial, I will show you how to add support for the H2 in-memory database to your Spring Boot project with Spring Security enabled. By the end of this tutorial, you will be able to watch a video demonstration of how to implement it.
After following the steps below, your Spring Boot project will be configured to use the H2 in-memory database. Any data written to this database will be stored in memory, which means that if you restart or shut down your Spring Boot application, any data stored in the in-memory database tables will be lost.
Add H2 In-Memory Database POM.xml Dependency
Open the POM.xml file of your Spring Boot project and add the following dependency:
<dependency>
    <groupId>com.h2database</groupId>
    <artifactId>h2</artifactId>
    <scope>runtime</scope>
</dependency>
Update the application.properties File
To use the H2 in-memory database console and view the content of its tables, enable the h2-console in your application.properties file.
Add the following lines to the application.properties file:
spring.h2.console.enabled=true
spring.datasource.url=jdbc:h2:mem:testdb
spring.datasource.driverClassName=org.h2.Driver
spring.jpa.database-platform=org.hibernate.dialect.H2Dialect
Configure HttpSecurity
Disable the frameOptions()
If your Spring Boot project uses Spring Security, you probably have a class that is annotated with @EnableWebSecurity annotation. To disable the HTTP Header Frame Options, add the following to the configure() method of that class. Frame options are necessary to prevent a browser from loading your HTML page in an <iframe> or <frame> tag. To enable the H2 Console page to load, you need to disable this option.
http.headers().frameOptions().disable();
Allow access to /h2-console URL path
To access the H2 in-memory database console, you will also need to allow access to the /h2-console path. This can be done by adding the following code snippet to your HttpSecurity configuration:
requestMatchers(new AntPathRequestMatcher("/h2-console/**"))
                .permitAll()
Here is my complete configure() function, which configures the HttpSecurity. Note that I granted access to the /h2-console URL.
    @Bean
    protected SecurityFilterChain configure(HttpSecurity http) throws Exception {

    http.csrf(csrf -> csrf.disable());

    http.authorizeHttpRequests(authz -> authz
            .requestMatchers(HttpMethod.POST, "/users").permitAll()
            .requestMatchers(new AntPathRequestMatcher("/h2-console/**")).permitAll()
            .anyRequest().authenticated())
            .addFilter(new AuthenticationFilter(authenticationManager()))
            .addFilter(new AuthorizationFilter(authenticationManager()))
            .sessionManagement(session -> session
                    .sessionCreationPolicy(SessionCreationPolicy.STATELESS));

    http.headers().frameOptions().disable();

      return http.build();
   }
Now, you should be able to do the following:
- Build and Run your Spring Boot application
- Open the URL http://localhost:8080/<application context>/h2-console in your browser window. Note that you should only include the <application context> if you have set it in your application.properties file, like this:
server.servlet.context-path=/MyProjectName
If you have not set an application context, leave out this part of the URL.
H2 Console Login page
After completing the above steps, you should see the following login page:
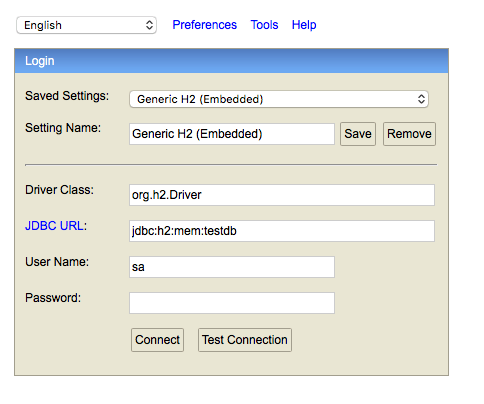
To start working with the H2 in-memory database, click on ‘Connect’ to sign in to your H2 Console.
Database “mem:testdb” not found, either pre-create it or allow remote database creation
If you encounter the error message ‘Database “mem:testdb” not found, either pre-create it or allow remote database creation’ while attempting to log in, you need to configure the H2 database access details in the application.properties file.
spring.h2.console.enabled=true
spring.datasource.username=sergey
spring.datasource.password=sergey
spring.datasource.url=jdbc:h2:mem:testdb
spring.datasource.driverClassName=org.h2.Driver
spring.jpa.database-platform=org.hibernate.dialect.H2Dialect
This should resolve the issue.
Video Demonstration
You can find more videos here: RESTful Web Services, Java, Spring Boot, Spring MVC and JPA
If you’re interested in further learning about Spring Boot, we recommend checking out the video courses listed above. Hopefully, one of them will be useful to you.