UIBarButtonItem programmatically without using the storyboard or the interface builder. I will cover topics such as:- Create UIBarButtonItem programmatically.
- How to set the right sidebar button item
rightBarButtonItem. - How to set the left sidebar button item
leftBarButtonItem. - How to set target action on
UIBarButtonItemto call a custom function when the button is tapped.
Creating UIBarButtonItem Programmatically
To create a UIBarButtonItem programmatically, you need to instantiate a UIBarButtonItem object. You can use the UIBarButtonItem initializer that takes several parameters, including the title, style, target, and action.
For example, to create a plain button titled “Done” that calls a method named myRightSideBarButtonItemTapped when tapped, you can use:
let rightBarButton = UIBarButtonItem(title: "Done", style: .plain, target: self, action: #selector(myRightSideBarButtonItemTapped(_:)))
Here, the target is the object that will perform the action, which is usually self. The action is the selector of the method that will be called when the button is tapped.
Adding UIBarButtonItem to the Navigation Bar
After creating the UIBarButtonItem, you need to add it to the navigation bar. You can do this by assigning the UIBarButtonItem to the rightBarButtonItem or leftBarButtonItem property of the navigationItem of the view controller. For example, to add the right button to the right side of the navigation bar, you can use:
self.navigationItem.rightBarButtonItem = rightBarButton
Similarly, to add the left button to the left side of the navigation bar, you can use:
self.navigationItem.leftBarButtonItem = leftBarButton
You can also add multiple UIBarButtonItems to the navigation bar by using the rightBarButtonItems or leftBarButtonItems property.
Handling UIBarButtonItem Tap Event
To handle the tap event of the UIBarButtonItem, you need to implement the method specified in the action parameter of the UIBarButtonItem initializer. In this case, you need to implement the myRightSideBarButtonItemTapped and myLeftSideBarButtonItemTapped methods. For example:
@objc func myRightSideBarButtonItemTapped(_ sender: UIBarButtonItem) {
    print("Right side bar button tapped")
}

@objc func myLeftSideBarButtonItemTapped(_ sender: UIBarButtonItem) {
    print("Left side bar button tapped")
}
These methods will be called when the corresponding UIBarButtonItem is tapped, and they will print a message to the console.
Complete Code Example
Here is the complete code example based on the above explanations:
import UIKit

class ViewController: UIViewController {

    override func viewDidLoad() {
        super.viewDidLoad()

        let rightBarButton = UIBarButtonItem(title: "Done", style: .plain, target: self, action: #selector(myRightSideBarButtonItemTapped(_:)))
        self.navigationItem.rightBarButtonItem = rightBarButton

        let leftBarButton = UIBarButtonItem(title: "Edit", style: .done, target: self, action: #selector(myLeftSideBarButtonItemTapped(_:)))
        self.navigationItem.leftBarButtonItem = leftBarButton
    }

    @objc func myRightSideBarButtonItemTapped(_ sender: UIBarButtonItem) {
        print("Right side bar button tapped")
    }

    @objc func myLeftSideBarButtonItemTapped(_ sender: UIBarButtonItem) {
        print("Left side bar button tapped")
    }

    override func didReceiveMemoryWarning() {
        super.didReceiveMemoryWarning()
    }
}
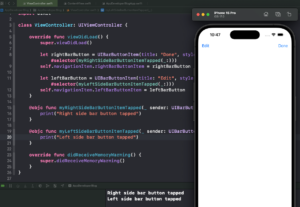
In this code, you created two buttons, one on the right side of the navigation bar with the title “Done”, and another on the left side with the title “Edit”. Each button has an associated action that prints a message to the console when the button is tapped.
Conclusion
In conclusion, this tutorial showed you how to create a UIBarButtonItem programmatically in Swift, add it to the navigation bar, and handle its tap event.
For more Swift Code examples and tutorials, please check the Swift Code Examples page on this website.
If you are interested in video lessons on how to write Unit tests and UI tests to test your Swift mobile app, check out this page: Unit Testing Swift Mobile App
Happy learning!