In this tutorial, I will share how to generate a self-signed certificate and enable HTTPS/SSL support in a Spring Boot application. You will also learn how to configure the RestTemplate HTTP client to use the same self-signed certificate to communicate with your Web Service over HTTPS.
Let’s start by generating a self-signed certificate.
Generate Self-Signed Certificate
You can generate a self-signed certificate using a keytool command. The certificate will be stored in a PKCS12 Keystore file.
You will need to open a terminal window and run the below command, but before you run the command, please replace the values in it with the ones relevant to you.
keytool -genkeypair -alias AppsDeveloperBlog -keyalg RSA -keysize 2048 -storetype PKCS12 -keystore AppsDeveloperBlog.p12 -validity 3650 -storepass sergey
If you are going to use this certificate on localhost then add the following -ext “SAN:c=DNS:localhost,IP:127.0.0.1”. So for localhost use, the complete command will look like this:
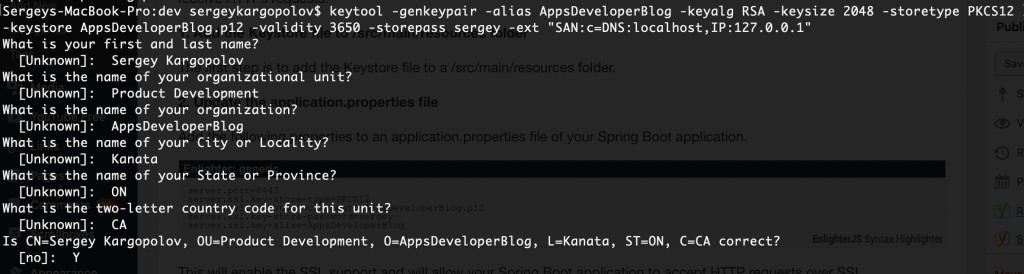
keytool -genkeypair -alias AppsDeveloperBlog -keyalg RSA -keysize 2048 -storetype PKCS12 -keystore AppsDeveloperBlog.p12 -validity 3650 -storepass sergey -ext "SAN:c=DNS:localhost,IP:127.0.0.1"
- genkeypair: generates a key pair;
- alias: the alias name to access the item in a keystore file. Choose Your own alias name;
- keyalg: the cryptographic algorithm to generate the key pair;
- keysize: the size of the key;
- storetype: the type of keystore;
- keystore: the name of the keystore file;
- validity: the number of days this certificate should be valid;
- storepass: a password to access the keystore file. Choose your own password.
Once you run the above command, you will be asked a series of questions. Provide your answers, and in the end, a PKCS12 Keystore file will be generated.
Here is how it looked on my computer.
Use the following command to verify the generated file and see if you can access its content with the provided Keystore password.
keytool -list -v -storetype pkcs12 -keystore <YOUR KEYSTORE FILE NAME HERE>.p12
When the self-signed certificate is created, we can add it to our Spring Boot application and enable SSL support.
Enable HTTPS in Spring Boot App (Web Service)
Now let’s add the generated Keystore file to our Spring Boot application and enable the SSL support in it so that it can receive HTTPS requests.
1. Add the Keystore file to /src/main/resources folder
The first step is to add the Keystore file to a /src/main/resources folder.
2. Update the application.properties file
Add the following properties to an application.properties file of your Spring Boot application.
server.port=8443
server.ssl.key-store-type=PKCS12
server.ssl.key-store=classpath:AppsDeveloperBlog.p12
server.ssl.key-store-password=sergey
server.ssl.key-alias=AppsDeveloperBlog
This will enable SSL support and allow your Spring Boot application to accept HTTP requests over SSL.
If your Spring Boot application also uses Spring Security, you can configure it to accept only HTTPS requests. To do that, add the following property.
security.require-ssl=true
Enable SSL in HTTP Client(RestTemplate)
Now that we have enabled HTTPS in our Spring Boot Web Service, we need to enable SSL support in the HTTP client so that it can use the same self-signed certificate to communicate with our Web Service endpoint over SSL.
1. Add the Keystore file to /src/main/resources folder
The first step will be to add the generated Keystore file(p12) to our Spring Boot application that will use the HTTP Client(RestTemplate) to send HTTP requests.
2. Add HTTP Components dependency to pom.xml file.
<dependency>
      <groupId>org.apache.httpcomponents</groupId>
      <artifactId>httpclient</artifactId>
  </dependency>
3. Enable SSL Support in RestTemplate and make it use the self-signed certificate
The following code snippet demonstrates how you can configure RestClient to use the self-signed certificate.
The below code snippet sends HTTP GET request to a Web Service endpoint that returns a plain String. This Web Service endpoint is exposed by a Spring Boot application that uses a self-signed SSL certificate.
final String password = "sergey";

SSLContext sslContext = SSLContextBuilder
        .create()
        .loadTrustMaterial(ResourceUtils.getFile("classpath:AppsDeveloperBlog.p12"), password.toCharArray())
        .build();

CloseableHttpClient client = HttpClients.custom()
        .setSSLContext(sslContext)
        .build();

HttpComponentsClientHttpRequestFactory requestFactory
        = new HttpComponentsClientHttpRequestFactory();
requestFactory.setHttpClient(client);

RestTemplate restTemplate = new RestTemplate(requestFactory);

String url = "https://localhost:8443/status/check"; // Web Service endpoint that requires SSL

ResponseEntity<String> response = restTemplate.exchange(url, HttpMethod.GET, HttpEntity.EMPTY, String.class);

System.out.println("Result = " + response.getBody());
Here is what my Spring Boot Command Line Runner application looks like:
package com.appsdeveloperblog.tutorials.RestTemplateSSLClient;

import javax.net.ssl.SSLContext;
import org.apache.http.impl.client.CloseableHttpClient;
import org.apache.http.impl.client.HttpClients;
import org.apache.http.ssl.SSLContextBuilder;
import org.springframework.boot.CommandLineRunner;
import org.springframework.boot.SpringApplication;
import org.springframework.boot.autoconfigure.SpringBootApplication;
import org.springframework.http.HttpEntity;
import org.springframework.http.HttpMethod;
import org.springframework.http.ResponseEntity;
import org.springframework.http.client.HttpComponentsClientHttpRequestFactory;
import org.springframework.util.ResourceUtils;
import org.springframework.web.client.RestTemplate;

@SpringBootApplication
public class RestTemplateSslClientApplication implements CommandLineRunner {

    public static void main(String[] args) {
        SpringApplication.run(RestTemplateSslClientApplication.class, args);
    }

    @Override
    public void run(String... args) throws Exception {
        final String password = "sergey";
        SSLContext sslContext = SSLContextBuilder
                .create()
                .loadTrustMaterial(ResourceUtils.getFile("classpath:AppsDeveloperBlog.p12"), password.toCharArray())
                .build();

        CloseableHttpClient client = HttpClients.custom()
                .setSSLContext(sslContext)
                .build();

        HttpComponentsClientHttpRequestFactory requestFactory
                = new HttpComponentsClientHttpRequestFactory();
        requestFactory.setHttpClient(client);

        RestTemplate restTemplate = new RestTemplate(requestFactory);

        String url = "https://localhost:8443/status/check";

        ResponseEntity<String> response = restTemplate.exchange(url, HttpMethod.GET, HttpEntity.EMPTY, String.class);

        System.out.println("Result = " + response.getBody());
    }

}
I hope this tutorial was helpful to you. If you want to learn more about building RESTful Web Services with Spring boot, check out my Spring Boot tutorials or my Spring Cloud and Microservices tutorials.
Also, if you enjoy learning by watching online video lessons, then have a look at the below list of online video courses. You might like one of them.