In this article, we will learn about Many-to-Many relationships in JPA and how to implement them in a Spring Boot application. Let’s get started!
@ManytoMany annotation
A many-to-many relationship occurs when multiple records in one table are associated with multiple records in another table. The @ManyToMany annotation is used to define a many-valued association with many-to-many multiplicity. According to the official documentation:
Every many-to-many association has two sides: the owning side and the non-owning (or inverse) side. The join table is specified on the owning side. If the relationship is bidirectional, the non-owning side must use the mappedBy element of the @ManyToMany annotation to specify the relationship field or property of the owning side.
Unidirectional or Bidirectional?
When working with JPA, the @ManyToMany annotation is used to model many-to-many relationships between entities.
There are two types of associations in JPA: unidirectional and bidirectional. In a unidirectional association, only one entity maintains a relationship with the other entity, meaning that one entity has a reference to the other entity, but not vice versa. In a bidirectional association, both entities maintain a relationship with each other, meaning that each entity has a reference to the other entity.
In the context of a many-to-many relationship, a unidirectional association implies that one entity has a collection of related entities, but the related entities do not have a reference to the original entity. In a bidirectional association, each entity has a collection of related entities, and each related entity has a reference back to the original entity.
Unidirectional example:
Imagine you have two entities: Author and Book. An author can write many books, and a book can be written by many authors.
In a unidirectional relationship, the Author entity would have a collection of related Book entities. However, the Book entity would not have a reference to the Author entity.
This means that you could easily retrieve all the books written by a specific author, but you would not be able to retrieve all the authors of a specific book without making additional queries to the database.
Bidirectional example:
In a bidirectional relationship, both the Author entity and the Book entity would have a reference to each other.
This means that you could easily retrieve all the books written by a specific author, as well as all the authors of a specific book, without making additional queries to the database.
In summary, the main difference between unidirectional and bidirectional relationships is the ability to navigate between the related entities in both directions.
If you are learning about Hibernate, you might also be interested in the following tutorials:
- One-to-One Mapping Hibernate/JPA Using Spring Boot and MySQL
- One-to-Many Mapping Hibernate/JPA Using Spring Boot and MySQL
- Persist Java Object in MySQL Database With Hibernate
- Show Hibernate SQL Query in Spring Boot
Illustration using an Employees Portal Example
Let’s take an example of an Employees Portal for a University. An employee can be a teacher and a chairman at the same time. Similarly, the roles of a teacher and a chairman can be assigned to several employees from different departments. This is an example of a many-to-many relationship.
To understand the many-to-many relationship in this scenario, let’s consider two entities: Users and Role. Here is a simplified version of the Entity-Relationship Diagram:
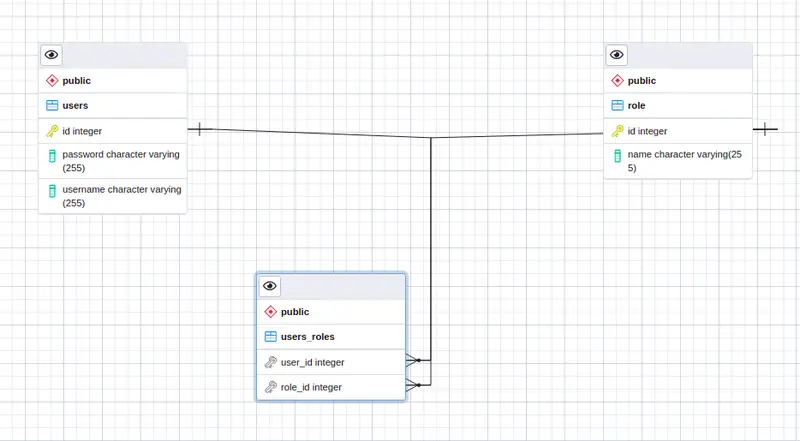
Database Structure
In our example, we are using PostgreSQL as the RDBMS. As a side note, it’s worth noting that creating a table with the name “User” in PostgreSQL wouldn’t work since “User” is a keyword in PostgreSQL.
Returning to the ER diagram, we have a users table with id as the primary key, and another table role with id as the primary key. There is also a join table called users_roles responsible for connecting the two sides using the foreign keys user_id and role_id.
Initialize Project Structure
Create a Maven Spring Boot Project in any of your favourite IDE. Refer to this article for more details.
pom.xml
<?xml version="1.0" encoding="UTF-8"?>
<project xmlns="http://maven.apache.org/POM/4.0.0" xmlns:xsi="http://www.w3.org/2001/XMLSchema-instance"
         xsi:schemaLocation="http://maven.apache.org/POM/4.0.0 https://maven.apache.org/xsd/maven-4.0.0.xsd">
    <modelVersion>4.0.0</modelVersion>
    <parent>
        <groupId>org.springframework.boot</groupId>
        <artifactId>spring-boot-starter-parent</artifactId>
        <version>2.5.6</version>
        <relativePath/>
        <!-- lookup parent from repository -->
    </parent>
    <groupId>com.library</groupId>
    <artifactId>manytomanyrelationship</artifactId>
    <version>0.0.1-SNAPSHOT</version>
    <name>ManyToManyExample</name>
    <description>Many to Many Relationship Example in Spring Boot Application</description>
    <properties>
        <java.version>11</java.version>
    </properties>
    <dependencies>
        <dependency>
            <groupId>org.springframework.boot</groupId>
            <artifactId>spring-boot-starter-test</artifactId>
            <scope>test</scope>
        </dependency>
        <dependency>
            <groupId>org.springframework.boot</groupId>
            <artifactId>spring-boot-starter-data-jpa</artifactId>
        </dependency>
        <dependency>
            <groupId>org.springframework.boot</groupId>
            <artifactId>spring-boot-starter-web</artifactId>
        </dependency>
        <dependency>
            <groupId>org.postgresql</groupId>
            <artifactId>postgresql</artifactId>
            <scope>runtime</scope>
        </dependency>
    </dependencies>
    <build>
        <plugins>
            <plugin>
                <groupId>org.springframework.boot</groupId>
                <artifactId>spring-boot-maven-plugin</artifactId>
            </plugin>
        </plugins>
    </build>
</project>
application.properties
pring.datasource.url=jdbc:postgresql://localhost:5432/postgres
spring.datasource.username=test
spring.datasource.password=test
spring.datasource.driverClassName=org.postgresql.Driver
spring.jpa.generate-ddl=true
spring.jpa.hibernate.ddl-auto = create
spring.jpa.show-sql= true
Define the Domain Model Classes
Create model classes for Users and Role with the JPA Annotations. Upon execution, Spring and JPA will handle the rest for you.
Users
package com.manytomanyrelationship.domain;

import javax.persistence.*;
import java.util.Collection;

@Entity
public class Users {
    @Id
    @GeneratedValue(strategy = GenerationType.AUTO)
    Integer id;
    String username;
    String password;

    @ManyToMany
    @JoinTable(name = "users_roles", joinColumns = @JoinColumn(name = "user_id", referencedColumnName = "id"), inverseJoinColumns = @JoinColumn(name = "role_id", referencedColumnName = "id"))
    private Collection<Role> roles;

    public Users() {

    }

    public Users(String username, String password, Collection<Role> roles) {
        this.username = username;
        this.password = password;
        this.roles = roles;
    }

    public String getUsername() {
        return username;
    }

    public void setUsername(String username) {
        this.username = username;
    }

    public String getPassword() {
        return password;
    }

    public void setPassword(String password) {
        this.password = password;
    }

    public Collection<Role> getRoles() {
        return roles;
    }

    public void setRoles(Collection<Role> roles) {
        this.roles = roles;
    }
}
Role
package com.manytomanyrelationship.domain;

import javax.persistence.Entity;
import javax.persistence.GeneratedValue;
import javax.persistence.GenerationType;
import javax.persistence.Id;

@Entity
public class Role {
    @Id
    @GeneratedValue(strategy = GenerationType.AUTO)
    Integer id;
    String name;

    public Role(Integer id, String name) {
        this.id = id;
        this.name = name;
    }

    public Role(String name) {
        super();
        this.name = name;
    }

    public Role() { // TODO Auto-generated constructor stub }

    }

    public String getName() {
        return name;
    }

    public void setName(String name) {
        this.name = name;
    }
}
The role is a simple Model class with no information about Users. However, we have used @ManyToMany annotation in a Users entity, making a Unidirectional Many to Many Mapping. Moreover, navigation is only possible from one side.
- The annotation @Entity indicates that the classes are JPA entities.
- The attribute id is marked with @Id and @GeneratedValue annotations in both classes. Firstly, @Id annotation denotes that this is the primary key. The latter annotation defines the primary key generation strategy with a strategy type as AUTOINCREMENT.
- The @ManyToMany annotation is applied to the List of Role attribute in the Users class, indicating a many-to-many relationship between the two entities. Furthermore, using CascadeType.ALL assures cascading means after the persistence of Users tuples, the persistence of Role tuples also occurs.
- In addition, to the @ManyToMany annotation, the @JoinTable annotation is used. The @JoinTable annotation serves the purpose of creating a users_role table resulting in connecting the Users and Role entity. The parameter joinColumn will hold the primary key of this Users entity (the Owning side) whereas inverseJoinColumns will hold the primary key of the other entity (the inverse of the relationship), i.e. Role in our example.
Define the Rest Controller
UsersController
package com.manytomanyrelationship.rest;

import com.manytomanyrelationship.service.UsersService;
import org.springframework.beans.factory.annotation.Autowired;
import org.springframework.http.ResponseEntity;
import org.springframework.web.bind.annotation.RequestMapping;
import org.springframework.web.bind.annotation.RestController;

@RestController
public class UsersController {
@Autowired
private UsersService usersService;

@RequestMapping("/getUsers")
public ResponseEntity<Object> getAllUsers() {
return usersService.getAllUsers();
}
}
Define the Service Class
UsersService
package com.manytomanyrelationship.service;

import com.manytomanyrelationship.domain.Users;
import com.manytomanyrelationship.repository.UsersRepository;
import org.springframework.beans.factory.annotation.Autowired;
import org.springframework.http.HttpStatus;
import org.springframework.http.ResponseEntity;
import org.springframework.stereotype.Service;

import java.util.List;

@Service
public class UsersService {

    @Autowired
    private UsersRepository usersRepository;

    public ResponseEntity<Object> getAllUsers() {
        List<Users> dbUsers = usersRepository.findAll();
        if (dbUsers.isEmpty()) {
            return new ResponseEntity<>(HttpStatus.NOT_FOUND);
        }
        // TODO Auto-generated method stub
        return new ResponseEntity<>(dbUsers, HttpStatus.OK);
    }
}
Define the Repository Class
UsersRepository
To retrieve Users from the database, we need to create a UsersRepository class that extends the JpaRepository interface. This interface includes methods that allow us to perform basic CRUD (Create, Read, Update, and Delete) operations on the database.
package com.manytomanyrelationship.repository;

import com.manytomanyrelationship.domain.Users;
import org.springframework.data.jpa.repository.JpaRepository;
import org.springframework.stereotype.Repository;

@Repository
public interface UsersRepository extends JpaRepository<Users, Integer> {

}
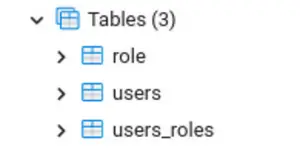
Build and Run the Application
Now it’s time to compile the code, run the application, and witness JPA Hibernate in action. Go to the database, and you’ll see the three tables that have been created. Since the DDL generation property is set to true, the tables are automatically generated.
Testing
To test the implementation, let’s add a few records to our main Spring Boot Application class.
package com.manytomanyrelationship;

import com.manytomanyrelationship.domain.Role;
import com.manytomanyrelationship.domain.Users;
import com.manytomanyrelationship.repository.UsersRepository;
import org.apache.logging.log4j.LogManager;
import org.apache.logging.log4j.Logger;
import org.springframework.boot.SpringApplication;
import org.springframework.boot.autoconfigure.SpringBootApplication;
import org.springframework.context.ApplicationContext;

import java.util.ArrayList;
import java.util.Collections;
import java.util.List;

@SpringBootApplication
public class DemoApplication {

    static final Logger logger = LogManager.getLogger(DemoApplication.class);

    public static void main(String[] args) {
        ApplicationContext context = SpringApplication.run(DemoApplication.class, args);
        logger.info("hello!!");
        UsersRepository usersRepository = context.getBean(UsersRepository.class);

        usersRepository.save(createUserObject1());
        usersRepository.save(createUserObject2());
    }

    private static Users createUserObject1() {
        Users user = new Users();
        user.setUsername("user1");
        user.setPassword("testPassword");

        Role role = new Role();
        role.setName("Lab Staff");
        List<Role> roles = Collections.singletonList(role);
        user.setRoles(roles);
        return user;
    }

    private static Users createUserObject2() {
        Users user = new Users();
        user.setUsername("user2");
        user.setPassword("testPassword2");

        Role role1 = new Role();
        role1.setName("Teacher");

        Role role2 = new Role();
        role2.setName("Chairman");
        List<Role> roles = new ArrayList<>();
        roles.add(role1);
        roles.add(role2);
        user.setRoles(roles);
        return user;
    }
}
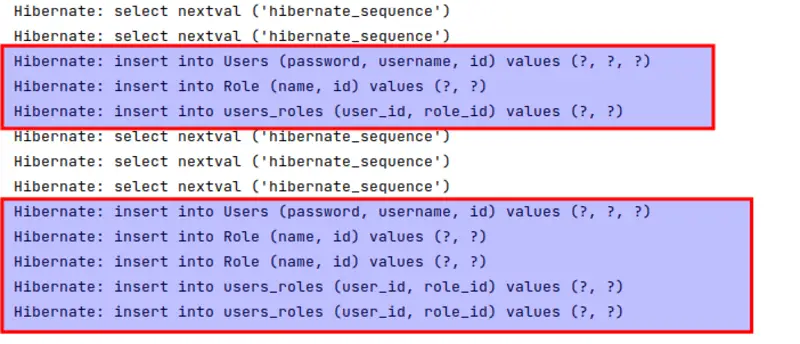
We have saved two User records using UsersRepository, and from the console, we can observe the order of record persistence. Firstly, the data is entered into the Users table. Secondly, the records in the Role table are inserted. Finally, the user_roles table is populated with the relevant primary keys. Here is a snapshot of the console logs for better understanding:
Now, we can test the REST API that we have exposed.
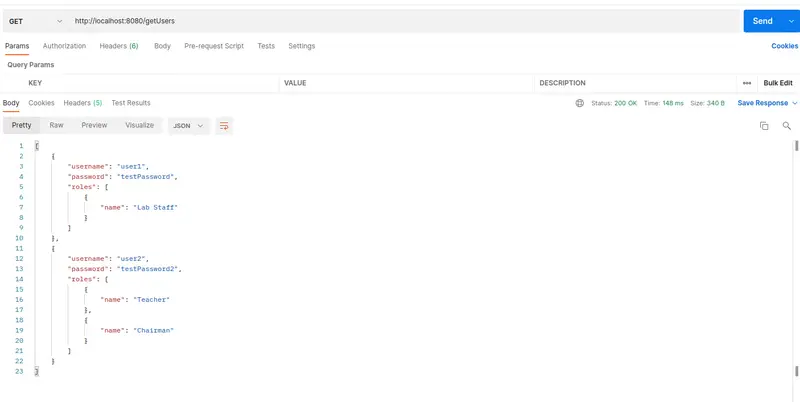
Please note that we have provided the password in plain text for simplicity. However, it’s best practice not to store passwords in plain text or return them as such in the HTTP response, particularly in a production environment, as it poses a security risk.
Read the following tutorial, to learn how to encrypt a user’s password using Spring Framework.
Conclusion
This article has covered how to implement a unidirectional many-to-many relationship with JPA in a Spring Boot application. If you found this article helpful, please share your feedback or thoughts in the comments section.
If you want to learn more about Spring Boot, stay tuned for some exciting content coming soon!
Happy coding!