Progress Bars inform users about the status of ongoing task, such as loading an app, submitting a form, or saving updates. They communicate an app’s state and indicate available actions, such as whether users can navigate away from the current screen. In Flutter there are two types of progress indicators, linear and circular.
In this tutorial, you will learn how to create Progress Bars in Flutter. For this purpose we will follow the next steps:
- Create a new Flutter app,
- Types of Progress Bars,
- Create the UI and display progress bars.
1. Create a New Flutter Project
Go ahead and create a new Flutter app. If you don’t know how to create a project you can refer to the “Hello World App in Flutter” tutorial.
2. Types of Progress Bars
The Linear and Circular indicators can be both Indeterminate or Determinate.
- Indeterminate operations display the indicator continually growing and shrinking along the track until the process is complete.
- Determinate operations display the indicator increasing in width from 0 to 100% of the track, in sync with the process’s progress.
To create the Indeterminate we simply call the widgets: LinearProgressIndicator() or CircularProgressIndicator(). This will cause the indicator to continuously run without stopping, as we do not call the property value.
AnimationController controller;
Once we have this, in the build method we create the “void initState()” and in it, we call the following:
@override
void initState() {
  controller = AnimationController(
    vsync: this,
    duration: const Duration(seconds: 5),
  )..addListener(() {
      setState(() {});
    });
  controller.forward();
  super.initState();
}
Let’s go through the code and explain it. In the building of the widget we set the state of the Animation Controller and add a listener to it. We set the “vsync” to “this”. This will result in an error because you do not have the “TickerProvider“. To do this simply add the following:
class _MyHomePageState extends State<MyHomePage>
    with SingleTickerProviderStateMixin {
This will give us the value property for the indicators.
Next, we set the state of the controller to “controller.forward()” which will result in the indicator filling up and stopping with movement. If you would like you can experiment with the “repeat()” property etc. You can also customize and use different colors.
In the next step, we will create all of the indicators and display them.
3. Create The UI and Display the Progress Bars
Strip the whole code of the initial app and keep only the following:
import 'package:flutter/material.dart';
import 'package:flutter/animation.dart';

void main() => runApp(MyApp());

class MyApp extends StatelessWidget {
  @override
  Widget build(BuildContext context) {
    return MaterialApp(
      title: 'Flutter Demo',
      theme: ThemeData(
        primarySwatch: Colors.teal,
      ),
      // List all of the app's supported locales here
      home: MyHomePage(),
    );
  }
}

class MyHomePage extends StatefulWidget {
  @override
  _MyHomePageState createState() => _MyHomePageState();
}

class _MyHomePageState extends State<MyHomePage>
    with SingleTickerProviderStateMixin {
  AnimationController controller;

  @override
  void initState() {
    controller = AnimationController(
      vsync: this,
      duration: const Duration(seconds: 5),
    )..addListener(() {
        setState(() {});
      });
    controller.forward();
    super.initState();
  }

  @override
  void dispose() {
    controller.dispose();
    super.dispose();
  }

  @override
  Widget build(BuildContext context) {
    return Scaffold(
      appBar: AppBar(
        title: Text('Progress Bar Flutter'),
      ),
      body: Padding(
        padding: const EdgeInsets.all(20.0),
        child: Column(
          mainAxisAlignment: MainAxisAlignment.spaceEvenly,
          children: [

          ],
        ),
      ),
    );
  }
}
Here is the output:
![]()
After that, we will simply add all indicators, both with and without the value property, and see the output. Here is the code:
       LinearProgressIndicator(
           value: controller.value,
         ),
         LinearProgressIndicator(),
CircularProgressIndicator(
               value: controller.value,
             ),
             CircularProgressIndicator()
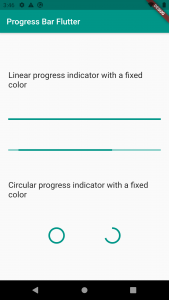
This will be the output on the emulator:
Here is the full app code for your reference:
import 'package:flutter/material.dart';
import 'package:flutter/animation.dart';

void main() => runApp(MyApp());

class MyApp extends StatelessWidget {
  @override
  Widget build(BuildContext context) {
    return MaterialApp(
      title: 'Flutter Demo',
      theme: ThemeData(
        primarySwatch: Colors.teal,
      ),
      // List all of the app's supported locales here
      home: MyHomePage(),
    );
  }
}

class MyHomePage extends StatefulWidget {
  @override
  _MyHomePageState createState() => _MyHomePageState();
}

class _MyHomePageState extends State<MyHomePage>
    with SingleTickerProviderStateMixin {
  AnimationController controller;

  @override
  void initState() {
    controller = AnimationController(
      vsync: this,
      duration: const Duration(seconds: 5),
    )..addListener(() {
        setState(() {});
      });
    controller.forward();
    super.initState();
  }

  @override
  void dispose() {
    controller.dispose();
    super.dispose();
  }

  @override
  Widget build(BuildContext context) {
    return Scaffold(
      appBar: AppBar(
        title: Text('Progress Bar Flutter'),
      ),
      body: Padding(
        padding: const EdgeInsets.all(20.0),
        child: Column(
          mainAxisAlignment: MainAxisAlignment.spaceEvenly,
          children: [
            Text(
              'Linear progress indicator with a fixed color',
              style: const TextStyle(fontSize: 20),
            ),
            LinearProgressIndicator(
              value: controller.value,
            ),
            LinearProgressIndicator(),
            Text(
              'Circular progress indicator with a fixed color',
              style: const TextStyle(fontSize: 20),
            ),
            Row(
              mainAxisAlignment: MainAxisAlignment.spaceEvenly,
              children: [
                CircularProgressIndicator(
                  value: controller.value,
                ),
                CircularProgressIndicator()
              ],
            )
          ],
        ),
      ),
    );
  }
}
I hope this Flutter tutorial was helpful for you. If you are interested in learning Flutter, please check other Flutter tutorials on this site. Some of them have video tutorials included.
Happy learning Flutter!