There are multiple ways of adding App Icon in Flutter, and here I’m going to cover some of those methods.
If you are interested in Flutter video tutorials, check this playlist: Flutter Video Tutorials. Also, there is a large collection of code examples if you check Flutter tutorials page.
Method 1: Using flutter_launcher_icons Package
The flutter_launcher_icons package takes in a source png file and generates icons for both iOS and Android.
To learn more about the flutter_launcher_icons package check out this link. Below are short instructions on how to used it to generate app icons for your iOS and Android app.
Step 1.
In your pubspec.yaml file add the following:
dev_dependencies:
  flutter_launcher_icons: "^0.8.0"

flutter_icons:
  android: "launcher_icon"
  ios: true
  image_path: "assets/icon/icon.png"
Where
- ic_launcher – is an app icon name for Android. If needed, you can change this name to a different one but in this case, you will also need to update the AndroidManifest.xml file. Later in this tutorial, I will explain how to do it,
- ios: true – tells the build runner to generate icons for iOS platform as well,
- assets/icon/icon.png – is the path to an icon file for iOS. It is an original icon file that will be used by the flutter_launcher_icons package to generate new app icons. It should be placed under the assets folder (ideally).
Step 2.
Open the terminal/command-line window on your computer and change the directory to the home folder of your app project. Then run the following commands:
flutter pub get

flutter pub run flutter_launcher_icons
This will generate icons for both iOS and Android apps automatically. The icons will automatically be placed in the corresponding directories for both iOS and Android. For android, if you choose some other file name instead of ic_launcher, it updates your manifest file too!
Method 2: Manual (Not recommended)
This is a very inconvenient method and is not recommended. It involves manual work and it is easy to miss one of the icons.
In this case, we need to create each icon for each platform manually. We need to create multiple icon sizes for the iOS platform and multiple icon sizes for the Android platform. Once we have created all icons manually ourselves we then need to give these icons proper icon names, and then, we need to manually copy and paste each icon into its proper folder in iOS and Android projects.
To make it easier and generate app icons of different sizes, you can head over to a free service like https://appicon.co/. The AppIcon.co allows you to upload your icon file and it will generate all icons for you, you just need to copy and paste each icon into a correct folder in your app project.
Once you have all icon sizes ready, then:
For Android
- Open the Project in your favorite editor
- Navigate to android/app/src/main/res
- In this folder, you’ll see multiple mipmap folders
- In each of the mipmap folder, there is a file called ic_launcher
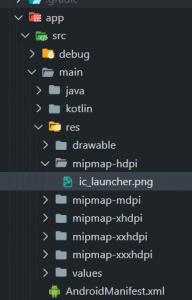
- You need to replace these files with the icons you have prepared. Please make sure that each icon has the correct icon name,
- If you want to change the name of your files to some other name than ic_launcher, you can do that, but then you also need to make a change in the AndroidManifest.xml file under main. To do that, open the AndroidManifest.xml file and change the “ic_launcher” to any other icon filename you have inside your mipmap directory.
FlutterApplication and put your custom class here. -->
<application
    android:name="io.flutter.app.FlutterApplication"
    android:label="textformfield_validation"
    android:icon="@mipmap/ic_launcher">
    <activity
        android:name=".MainActivity"
        android:launchMode="singleTop"
NOTE:
1. Keep all the files inside the mipmap directory with the same name, i.e. all files should be “ic_launcher“, or “launcher_icons“, or any other name you prefer,
For iOS
- Navigate to ios/Runner/Assets.xcassets/Appicon.appiconset
- There are multiple files with the name Icon-App-{size}@{ratio}.png
- You need to replace these files with your app icons.
Remember, to help you create app icons of different sizes, you can head over to a website like https://appicon.co/. There you can upload your app icon and the website will generate app icon files for you.
![]()
Once app icons are generated, you’ll need to copy and paste them into respective folders in android and iOS projects. In Android project, copy and paste icon folders into android/main/res. For iOS project, copy and paste the generated Assets.xcassets to ios/Runner/Assets.xcassets/AppIcon.appiconset
Adaptive Icons for Android
Android 8.0 (API level 26) introduces adaptive launcher icons, which can display a variety of shapes across different device models. For example, an adaptive launcher icon can display a circular shape on one OEM device, and display a squircle on another device. Each device OEM provides a mask, which the system then uses to render all adaptive icons with the same shape. Adaptive launcher icons are also used in shortcuts, the Settings app, sharing dialogs, and the overview screen.
Below are the steps to show you how to generate adaptive icons using your Android studio. These icons will need to be used in the Android app.
Steps:
- Open your project in Android Studio,
- Open the android folder in the side-bar,
- Wait for the IDE to finish analyzing your app code,
- In the Project window, select the Android View,
- Right-click the res folder and select New > Image Asset
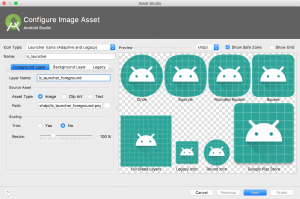
- Change asset type to Image/PNG
This is the recommended way to generate Android Icons since it generates adaptive icons that are sharper and work well in the Android ecosystem.
As a comparison:
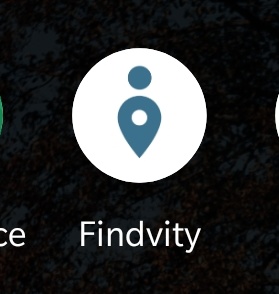
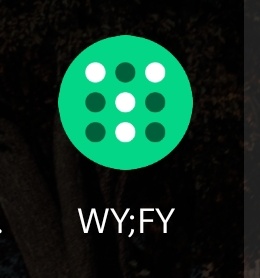
- The icon on the right (WY;FY) was generated with flutter_launcher_icons
- The icon on the left was made as an Android Studio adaptive icon. This icon is sharper and is better looking in general.
For iOS, it is simpler to use the flutter_launcher_icons package or the AppIcon.co website.
I hope this Flutter tutorial is helpful to you. If you are interested in learning Flutter, please check other Flutter tutorials on this site. Some of them have video tutorials included.
Happy learning!