In this tutorial, we will create a small Flutter function that calls android’s Kotlin native code to read the value of the battery level.
Flutter uses a flexible system that allows you to call platform-specific APIs whether available in Kotlin or Java code on Android.
Flutter’s built-in platform-specific API support does not rely on code generation, but rather on a flexible message-passing style.
Basically, the Flutter part of the app sends messages to its host iOS or Android part of the app, over a platform channel. The host listens on the platform channel, receives the message and calls platform-specific API’s using the native programming language, then sends the response back to the client(Flutter part of the app).
To make it work we will need to do the following:
- Create a new Flutter project,
- Create a MethodChannel object,
- Implement a function that calls the native Android code,
- Prepare UI to display the result,
- Implement a new function in Swift that reads the battery level.
Flutter
A named channel is used for communicating with platform plugins using asynchronous method calls. Method calls are encoded into binary before being sent, and binary results received are decoded into Dart values. The MethodCodec used must be compatible with the one used by the platform plugin.
1. Create a new Flutter project
To start off we will need to create a new Flutter project in Android Studio(or any IDE that you might be using), if you don’t know how to create a project you can refer to the “Hello World App in Flutter” tutorial.
2. Create the MethodChannel
Then we will construct the channel. We will use a MethodChannel with a single platform method that will return the battery level of the host by declaring the following constant:
static const platform = const MethodChannel('samples.flutter.dev/battery');
3. Create a Flutter Function that Calls the Native Android code
Below is a short code example that uses the MethodChannel and demonstrates how to write a function to get the battery level on the device.
Future<void> _getBatteryLevel() async {
  String batteryLevel;
  try {
    final int result = await platform.invokeMethod('getBatteryLevel');
    batteryLevel = 'Battery level at $result % .';
  } on PlatformException catch (e) {
    batteryLevel = "Failed to get battery level: '${e.message}'.";
  }

  setState(() {
    _batteryLevel = batteryLevel;
  });
}
As you can see in the code we created a Future function called “_getBatteryLevel()” that awaits for the “platform.invokeMethod(‘getBatteryLevel’)” which is the function we will discuss further down in the Android function section. The Flutter app will first check the platform. Once the platform is confirmed, the app will listen to the platform channel and check for the function that’s being called.
4. Flutter UI to display the result
As you can see we declared a String variable _batteryLevel and gave it a value “Battery Level”. Then we have declared a Future void _getBatteryLevel() function which is asynchronous. Inside the void, we are declaring an empty String “batteryLevel”. Then we wrap the call in a try-catch statement in case the method fails. In the try part of the statement, we will check the native method check battery and pass it in the batteryLevel as a String, then catch any error that might occur. After the try-catch statement, we simply set the state of _batteryLevel to a “batteryLevel” value.
Column(
          mainAxisAlignment: MainAxisAlignment.spaceEvenly,
          children: [
            ElevatedButton(

              child: Text('Get Battery Level'),
              onPressed: _getBatteryLevel,
            ),
            Text(_batteryLevel),
          ],
        ),
Complete Code Example in Flutter
Below is a complete code example in Flutter. Before running the app we will need to work in the MainActivity file inside the android folder.
import 'dart:async';
import 'package:flutter/material.dart';
import 'package:flutter/services.dart';
import 'package:flutter/cupertino.dart';

void main() {
  runApp(MyApp());
}

class MyApp extends StatelessWidget {
  @override
  Widget build(BuildContext context) {
    return MaterialApp(
      home: MyHomePage(),
    );
  }
}

class MyHomePage extends StatefulWidget {
  @override
  _MyHomePageState createState() => _MyHomePageState();
}

class _MyHomePageState extends State<MyHomePage> {
  static const platform = const MethodChannel('samples.flutter.dev/battery');
  String _batteryLevel =
      'Battery Level';

  Future<void> _getBatteryLevel() async {
    String batteryLevel;
    try {
      final int result = await platform.invokeMethod('getBatteryLevel');
      batteryLevel = 'Battery level at $result % .';
    } on PlatformException catch (e) {
      batteryLevel = "Failed to get battery level: '${e.message}'.";
    }

    setState(() {
      _batteryLevel = batteryLevel;
    });
  }


  @override
  Widget build(BuildContext context) {
    return Material(
      child: Center(
        child: Column(
          mainAxisAlignment: MainAxisAlignment.spaceEvenly,
          children: [
            ElevatedButton(

              child: Text('Get Battery Level'),
              onPressed: _getBatteryLevel,
            ),
            Text(_batteryLevel),
          ],
        ),
      ),
    );
  }
}
Android Kotlin. Creating the FlutterMethodChannel
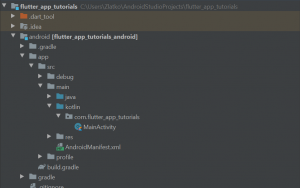
In the MainActivity file override the “application:didFinishLaunchingWithOptions” function and create a “FlutterMethodChannel” that will be tied to the samples.flutter.dev/battery channel name. To find the MainActivity file, open the “android” folder in your flutter project, open the “app” folder, then “main” folder, and in the “kotlin” folder we will find the file “MainActivity”. Have a look at the screenshot below for the location:
class MainActivity : FlutterActivity() {
    private val CHANNEL = "samples.flutter.dev/battery"

    override fun configureFlutterEngine(@NonNull flutterEngine: FlutterEngine) {
        super.configureFlutterEngine(flutterEngine)
        MethodChannel(flutterEngine.dartExecutor.binaryMessenger, CHANNEL).setMethodCallHandler {
            // Note: this method is invoked on the main thread.
            call, result ->
            if (call.method == "getBatteryLevel") {
                val batteryLevel = getBatteryLevel()

                if (batteryLevel != -1) {
                    result.success(batteryLevel)
                } else {
                    result.error("UNAVAILABLE", "Battery level not available.", null)
                }
            } else {
                result.notImplemented()
            }
        }

    }

}
Android Kotlin. The receiveBatteryLevel() Function
We are now ready to create the receiveBatteryLevel() Kotlin function that will actually read and return the buttery level value on the device. To do that we will use the native Android Battery API. Add the following function at the bottom of “MainActivity” class.
private fun getBatteryLevel(): Int {
    val batteryLevel: Int
    if (VERSION.SDK_INT >= VERSION_CODES.LOLLIPOP) {
        val batteryManager = getSystemService(Context.BATTERY_SERVICE) as BatteryManager
        batteryLevel = batteryManager.getIntProperty(BatteryManager.BATTERY_PROPERTY_CAPACITY)
    } else {
        val intent = ContextWrapper(applicationContext).registerReceiver(null, IntentFilter(Intent.ACTION_BATTERY_CHANGED))
        batteryLevel = intent!!.getIntExtra(BatteryManager.EXTRA_LEVEL, -1) * 100 / intent.getIntExtra(BatteryManager.EXTRA_SCALE, -1)
    }

    return batteryLevel
}
Here is a complete MainActivity file for reference:
package com.flutter_app_tutorials

import android.content.Context
import android.content.ContextWrapper
import android.content.Intent
import android.content.IntentFilter
import android.os.BatteryManager
import android.os.Build.VERSION
import android.os.Build.VERSION_CODES
import androidx.annotation.NonNull
import io.flutter.embedding.android.FlutterActivity
import io.flutter.embedding.engine.FlutterEngine
import io.flutter.plugin.common.MethodChannel

class MainActivity : FlutterActivity() {
    private val CHANNEL = "samples.flutter.dev/battery"

    override fun configureFlutterEngine(@NonNull flutterEngine: FlutterEngine) {
        super.configureFlutterEngine(flutterEngine)
        MethodChannel(flutterEngine.dartExecutor.binaryMessenger, CHANNEL).setMethodCallHandler {
            // Note: this method is invoked on the main thread.
            call, result ->
            if (call.method == "getBatteryLevel") {
                val batteryLevel = getBatteryLevel()

                if (batteryLevel != -1) {
                    result.success(batteryLevel)
                } else {
                    result.error("UNAVAILABLE", "Battery level not available.", null)
                }
            } else {
                result.notImplemented()
            }
        }

    }

    private fun getBatteryLevel(): Int {
        val batteryLevel: Int
        if (VERSION.SDK_INT >= VERSION_CODES.LOLLIPOP) {
            val batteryManager = getSystemService(Context.BATTERY_SERVICE) as BatteryManager
            batteryLevel = batteryManager.getIntProperty(BatteryManager.BATTERY_PROPERTY_CAPACITY)
        } else {
            val intent = ContextWrapper(applicationContext).registerReceiver(null, IntentFilter(Intent.ACTION_BATTERY_CHANGED))
            batteryLevel = intent!!.getIntExtra(BatteryManager.EXTRA_LEVEL, -1) * 100 / intent.getIntExtra(BatteryManager.EXTRA_SCALE, -1)
        }

        return batteryLevel
    }

}
After this, you should be able to see the output on your app, after running it should look like this:

After pressing the “Get Battery Level” button, this should be your output:

Note: If you use an emulator you will probably get “battery info unavailable”.
I hope this Flutter tutorial was helpful for you. If you are interested in learning Flutter, please check other Flutter tutorials on this site. Some of them have video tutorials included.