Introduction
Data tables are another indispensable part of everyday UI. We can provide information in a clear and concise manner, which is especially helpful owing to the fact that mobile displays are (relatively) small.
Today we’ll be covering DataTables in Flutter. The blog is divided into two parts:
- In Part 1: we go over the basics of creating a simple DataTable
- In Part 2: we have a hands-on for creating a simple app, where we write data into a CSV file and read data from it to create DataTable dynamically.
Part 1: Creating a Basic DataTable
Features
The DataTable class in Flutter has the following properties:
- It resizes column widths automatically based on data size,
- It has a very simple and intuitive syntax for using it.
Syntax
- First Create the DataTable Object (Widget)
- Then define the columns (column headings)
DataColumn()Each DataColumn has a “label” property. The label is the heading of that particular column. Since we’re talking Flutter it means…you guessed it! It can be any widget!
DataColumn( label: Text('Heading'), ) - Then add the DataColumns to the DataTable
DataTable( columns: [ DataColumn( label: Text('Name'), ), DataColumn( label: Text('Age'), ), DataColumn( label: Text('Role'), ), ], ), - Finally, define your DataRowsDataRow contains the actual Row of Data. It consists of many DataCells.For eg.
   DataRow(
       cells: <DataCell>[
         DataCell(Text('Sarah')),
         DataCell(Text('19')),
         DataCell(Text('Student')),
       ],
     ),
Note that the number of data cells in each row is equal to the number of data columns.
- Now we add the DataRows to the DataTable widget
  DataTable(
   columns: [
     DataColumn(
       label: Text('Name'),
     ),
     DataColumn(
       label: Text('Age'),
     ),
     DataColumn(
       label: Text('Role'),
     ),
   ],
   rows: const <DataRow>[
     DataRow(
       cells: <DataCell>[
         DataCell(Text('Sarah')),
         DataCell(Text('19')),
         DataCell(Text('Student')),
       ],
     ),
     DataRow(
       cells: <DataCell>[
         DataCell(Text('Janine')),
         DataCell(Text('43')),
         DataCell(Text('Professor')),
       ],
     ),
     DataRow(
       cells: <DataCell>[
         DataCell(Text('William')),
         DataCell(Text('27')),
         DataCell(Text('Associate Professor')),
       ],
     ),
   ],
 );
Results
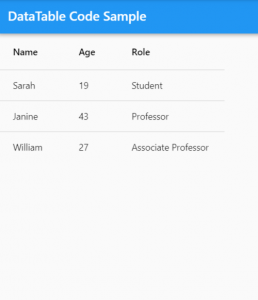
Thus, we have successfully learned how to create a basic DataTable in Flutter. Now, time for some hands-on!
Part 2: A practical scenario
Here, we are going to create a simple app that records the names and ages of participants and converts it into a CSV file.
Then we load the CSV into a data-table to view inside the app or share it.
We’ll be using the following packages:
- path_provider
Setup
- Create a new project
flutter create simple_datatable_app - Open the Project in your favorite editor!
- Clear everything in lib/main.dart
Starter code
You can copy this code to get started. It does the following:
- Defines main() as an entry point to your app
- Defines a root MaterialApp in MyApp widget
import 'package:flutter/material.dart';

void main(){
  runApp(MyApp());
}

class MyApp extends StatelessWidget {
  @override
  Widget build(BuildContext context) {
    return MaterialApp(
      theme: ThemeData.light(),
      home: HomeScreen(),
    );
  }
}
The HomeScreen
- Our home screen will be very simple. It will have two buttons.
- The first button is for adding data
- The second button is for sharing data
Creating Homescreen
- Create a new file under lib/screens name home_screen.dart
- Define a simple Stateless widget here, named HomeScreen
import 'package:flutter/material.dart';

class HomeScreen extends StatelessWidget {
  @override
  Widget build(BuildContext context) {
    return Container(

    );
  }
}
Adding buttons
- Create a Column
- Define two buttons in it, named “Add Data” and “View Data”
Now your home screen code should look like this:
import 'package:flutter/material.dart';

class HomeScreen extends StatelessWidget {
  @override
  Widget build(BuildContext context) {
    return Scaffold(
      appBar: AppBar(
        title: Text('Info'),
      ),
      body: Center(
        child: Column(
          mainAxisAlignment: MainAxisAlignment.center,
          children: [
            FlatButton(
              onPressed: () {},
              child: Text('Add Data'),
            ),
            FlatButton(
              onPressed: () {},
              child: Text('View Data'),
            ),
          ],
        ),
      ),
    );
  }
}
Note: Do not forget to import the home_screen.dart in the main.dart to remove the error!
import 'package:simple_datatable_app/screens/home_screen.dart';
Add-Data Screen
Now, let’s go ahead and create another screen for adding Data
- It should have two TextFormFields: One for Name, the other for Age
- It should have a submit button
To check how Forms, you should check out this blog: Form Validation in Flutter.
Next, let’s create the Add Data Screen.
Steps:
- Create a stateful widget Named “AddDataScreen“,
- Define the TextFormFields and the submit button,
- Add Controllers for the TextFormFields. To create controllers and TextFormFields check out this blog post: Form Validation in Flutter.
- For name, add the following validations:
- It should be required
- It should not contain commas (“,”)
- For the Age, add the following validations:
- It should be required
- It should be greater than 0
- It should not contain commas (“,”)
- Wrap both TextFormFields in a Form and Add the Formkey. Again, if you want to see how forms work, the link has been provided above.
In the end, your AddDataScreen code should look like this:
import 'package:flutter/material.dart';

class AddDataScreen extends StatefulWidget {
  @override
  _AddDataScreenState createState() => _AddDataScreenState();
}

class _AddDataScreenState extends State<AddDataScreen> {
  TextEditingController _nameController;
  TextEditingController _ageController;

  final _formKey = GlobalKey<FormState>();

  @override
  void initState() {
    super.initState();
    _nameController = TextEditingController();
    _ageController = TextEditingController();
  }

  @override
  void dispose() {
    super.dispose();
    _nameController.dispose();
    _ageController.dispose();
  }

  @override
  Widget build(BuildContext context) {
    return Scaffold(
      appBar: AppBar(
        title: Text('Add Data'),
      ),
      body: SingleChildScrollView(
        padding: EdgeInsets.all(16),
        child: Form(
          child: Column(
            children: [
              TextFormField(
                controller: _nameController,
                decoration: InputDecoration(
                  labelText: 'Name',
                ),
                validator: (value) {
                  if (value.isEmpty) {
                    return 'This field is required';
                  }
                  if (value.contains(",")) {
                    return 'Use of commas not allowed';
                  }
                },
              ),
              SizedBox(
                height: 20,
              ),
              TextFormField(
                controller: _ageController,
                decoration: InputDecoration(
                  labelText: 'Age',
                ),
                validator: (value) {
                  if (value.isEmpty) {
                    return 'This field is required';
                  }
                  if (value.contains(",")) {
                    return 'Use of commas not allowed';
                  }
                  if(int.tryParse(value)<=0 || int.tryParse(value)== null){
                    return 'Illegal age value provided';
                  }
                },
              ),
              SizedBox(
                height: 20,
              ),
              Container(
                width: double.maxFinite,
                child: RaisedButton.icon(
                  onPressed: () {
                    FocusScope.of(context).unfocus();
                    if(!_formKey.currentState.validate()){
                      return;
                    }
                    //else TODO: add method to save data into csv
                  },
                  icon: Icon(Icons.save),
                  label: Text('SAVE'),
                ),
              ),
            ],
          ),
        ),
      ),
    );
  }
}
Now, we’ll create a function to save this data into a CSV.
The function should do the following:
- Create a string of comma-separated values,
- Create a file,
- If the file exists, go to the end of the file to add data,
- Close the file.
Thus, we’ll require two packages:
- path_provider: to get the location of the storage directory,
- permission_handler: to get storage permission.
Step 1: Add the packages into pubspec.yaml
dependencies:
  flutter:
    sdk: flutter
  cupertino_icons: ^1.0.0
  path_provider:
  permission_handler:
Step 2: Add the following to the AndroidManifest.xml under android/app/src/main
<uses-permission android:name="android.permission.WRITE_EXTERNAL_STORAGE"/>
<uses-permission android:name="android.permission.READ_EXTERNAL_STORAGE"/>
The Utility Function to write to CSV File
Under lib/helpers create file name add_data.dart and then add the following lines into the file.
import 'dart:io';

import 'package:path_provider/path_provider.dart';
import 'package:permission_handler/permission_handler.dart';

Future<bool> addDataToCSV(String data) async {
  if (await Permission.storage.request().isGranted) {
    String dir = (await getExternalStorageDirectory()).path;
    print(dir);
    data += "\n";
    try {
      IOSink f = File(dir + "/data.csv").openWrite(mode: FileMode.writeOnlyAppend);
      f.write(data);
      f.close();
    } catch (e) {
      return false;
    }
    return true;
  }
  return false;
}
Explanation:
- The addDataToCSV() function takes in a string as input,
- It checks for storage permission,
- Then it gets the External Storage Directory Path,
- Then we append a newline character to the end of our data so that new data is added on a new line,
- After that, we open the file in Append mode, write the data into the file and close it,
- If everything is successful, we return true
- Else, we return false
Now, back in the AddDataScreen Widget, we add the following function:
addData() async {
    String csvString = "${_nameController.text},${_ageController.text}";
     print(csvString);
    bool done = await addDataToCSV(csvString);
    SnackBar snackBar;
    if (!done) {
      snackBar = SnackBar(
        content: Text('Unable to write to file'),
        backgroundColor: Colors.redAccent,
        behavior: SnackBarBehavior.floating,
      );
    } else {
      snackBar = SnackBar(
        content: Text('Data written to file'),
        backgroundColor: Colors.green,
        behavior: SnackBarBehavior.floating,
      );
    }
    _scaffoldKey.currentState.showSnackBar(snackBar);
  }
And create a _scaffoldKey variable below _formKey
final _scaffoldKey = GlobalKey();
Note: Don’t forget to add the key to Scaffold
return Scaffold(
      key: _scaffoldKey,
We need to call this function in the else part of onPressed() function, in the Submit Button.
Container(
  width: double.maxFinite,
  child: RaisedButton.icon(
    onPressed: () {
      FocusScope.of(context).unfocus();
      if(!_formKey.currentState.validate()){
        return;
      }
      addData();
    },
    icon: Icon(Icons.save),
    label: Text('SAVE'),
  ),
),
The Utility Function to Read from CSV File
Finally, we need to create another file called read_data.dart under lib/helpers directory. To this new file, we will add the following lines.
import 'dart:io';

import 'package:path_provider/path_provider.dart';
import 'package:permission_handler/permission_handler.dart';

Future<List<List<String>>> readDataFromCSV() async {
  if (await Permission.storage.request().isGranted) {
    String dir = (await getExternalStorageDirectory()).path;
    print(dir);
    try {
      String fContent = File(dir + "/data.csv").readAsStringSync();
      List<String> rows = fContent.split("\n");
      rows.removeLast();
      print(rows);
      List<List<String>> data = new List<List<String>>();
      for (var row in rows) {
        List<String> col = row.split(",");
        data.add(col);
      }
      print(data);
      return data;
    } catch (e) {
      print(e.toString());
    }
  }
}
- The readDataFromCSV() function reads the file and strips commas,
- It generates a list of [list of strings],
- and returns that list.
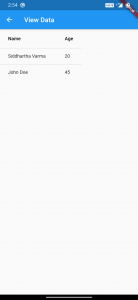
ViewDataScreen
Now, we create a new screen called ViewDataScreen. Here we’ll use our DataTable widget to show the details in an organized manner.
import 'package:flutter/material.dart';
import 'package:simple_datatable_app/helpers/read_data.dart';

class ViewDataScreen extends StatelessWidget {
  DataRow buildDataRow(List<String> data) {
    print("from buildDataRow");
    print(data);
    return DataRow(
      cells: data
          .map<DataCell>(
            (cell) => DataCell(
              Text(cell),
            ),
          )
          .toList(),
    );
  }

  buildDataColumns() {
    List columns = <DataColumn>[
      DataColumn(
        label: Text(
          'Name',
        ),
      ),
      DataColumn(
        label: Text(
          'Age',
        ),
      ),
    ];
    print("columns");
    print(columns.length);
    return columns;
  }

  @override
  Widget build(BuildContext context) {
    return Scaffold(
      appBar: AppBar(
        title: Text("View Data"),
      ),
      body: FutureBuilder<List<List<String>>>(
        future: readDataFromCSV(),
        builder: (context, snapshot) {
          if (!snapshot.hasData) {
            return Center(
              child: CircularProgressIndicator(),
            );
          }
          print(snapshot.data.length);
          return SingleChildScrollView(
            scrollDirection: Axis.horizontal,
            child: DataTable(rows: <DataRow>[
              for (int i = 0; i < snapshot.data.length; i++) buildDataRow(snapshot.data[i]),
            ], columns: buildDataColumns()),
          );
        },
      ),
    );
  }
}
This Screen has two utility functions: buildDataRows() and buildDataColumns():
- buildDataRows() – creates DataRows with DataCells in them from a list of strings
- buildDataColumns() – contains the hardcoded headings, it returns a list of DataColumns which is used to create the DataTable widget.
Finally, we have a FutureBuilder which uses the readDataFromCsv() function to get a list of [list of strings] which are used to build the DataRows and DataCells.
Final Steps
Finally, we need to push these pages from HomeScreen. We’ll add Navigator.push() to each of the buttons.
Update the home_page.dart file as follows:
FlatButton(
  onPressed: () {
    Navigator.push(
      context,
      MaterialPageRoute(
        builder: (context) => AddDataScreen(),
      ),
    );
  },
  child: Text('Add Data'),
),
FlatButton(
  onPressed: () {
    Navigator.push(
      context,
      MaterialPageRoute(
        builder: (context) => ViewDataScreen(),
      ),
    );
  },
  child: Text('View Data'),
),
Result:
This is how the App-Flow looks:
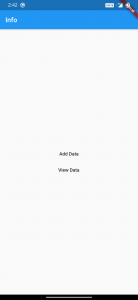
Home Page
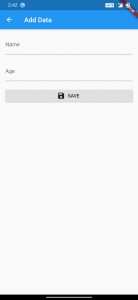
Add Data Screen
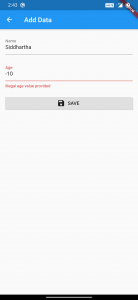
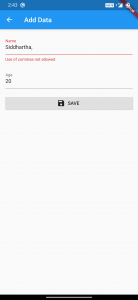
Basic Data Validation Checks

Asking storage permission to be able to write to External Storage Directory (once)
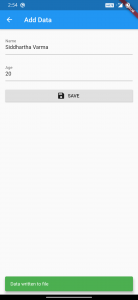
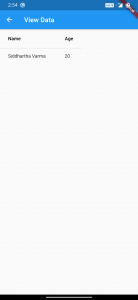
Snackbar showing data has been successfully written to file, and we check that the data shows up on View Data Screen
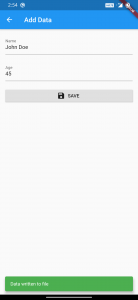
Writing some more data and seeing it shows up dynamically to the view data screen
Conclusion
In this “very long” tutorial, we have covered the basics of a DataTable and generating data for DataTable dynamically. We have also implemented a real-life usage scenario where we write to and read from the CSV file. I hope you enjoyed this tutorial.
Happy learning!