In this tutorial, you will learn how to implement Facebook Audience Network in Flutter. If you are an indie developer and want to generate some side revenue you can do it by adding Facebook ads to your Flutter mobile App.
1. Adding Package
To implement ads to your Flutter App there’s a special package to make your life easy, the package is facebook_audience_network.
Add this package to a pubspec.yaml file in your Flutter project.
dependencies:
  flutter:
    sdk: flutter
  facebook_audience_network: ^0.8.0
2. Adding Banner Ad In Flutter App
Banner ads occupy a spot within an app’s layout, either at the top or bottom of the device screen. They stay on screen while users are interacting with the app, and can refresh automatically after a certain period of time.
Before using the FacebookBannerAd widget in your code, import the Facebook Audience Network Package.
import 'package:facebook_audience_network/facebook_audience_network.dart'
Now when the Facebook Audience Network Package is imported we can use the FacebookBannerAd widget to add a banner.
Scaffold(
      appBar: AppBar(
        title: Text("Home"),
        centerTitle: true,
      ),
//Banner Widget//
      bottomNavigationBar: FacebookBannerAd(
        bannerSize: BannerSize.STANDARD,
        keepAlive: true,
        placementId: "Your Placement ID",
      ),
In the above code snippet, we have added the Banner widget to the bottomNavigationBar which is the property of a Scaffold Widget. It will add the Banner widget at the bottom of the screen (prefferent location), although you can add it wherever you need it to be.
Properties of Banner Widget
- bannerSize – The size of the widget you want to add. It takes the property of BannerSize with possible options like STANDARD, MEDIUM_RECTANGLE, and LARGE.
- keepAlive – It’s the property to keep the Banner Ad visible when scrolling (in Flutter the ListView.builder and Stream refresh the screen on the scroll).
- placementId- Banner placement id.
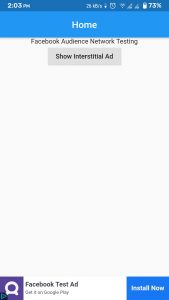
An image below illustrates how the banner ad will look like when is displayed in the app.
3. Adding an Interstitial Ad
Interstitial ads are interactive, full-screen ads that cover the interface of their host app or site. These ads appear between content, so they are placed at natural transition points or breaks, such as in between activities or game levels.
To add an Interstitial Ad in your Flutter project we first have to create a method to call the ad. If the ad loads successfully, then it will be shown to the user.
showInter() {
  FacebookInterstitialAd.loadInterstitialAd(
    placementId: "Your Placement Id",
    listener: (result, value) {
      if (result == InterstitialAdResult.LOADED)
        FacebookInterstitialAd.showInterstitialAd(delay: 2000);
    },
  );
}
FacebookInterstitialAd.loadInterstitialAd() has the following properties:
- placementId – Your Placement to show ad on the app and you can generate some revenue.
- listener – This property takes two parameters: the result and the value(error). We will use the result parameter to show the ads (if the ad is loaded and is available).
4. Creating a Button to Show an Interstitial Ad
To make the Interstitial Ad display we will call the showInter() method when user taps on a button. Below is a littlecode example that will call the showInter() function on button’s onPressed() event.
RaisedButton(
              onPressed: () {
                showInter();
              },
              child: Text("Show Interstitial Ad"),
            )
Complete Code Example
Below is a complete code example for you to run and see how it works. It will show both the Banner and an Interstitial Ad.
import 'package:flutter/material.dart';
import 'package:facebook_audience_network/facebook_audience_network.dart';

void main() {
  runApp(MyApp());
}

class MyApp extends StatelessWidget {
  @override
  Widget build(BuildContext context) {
    return MaterialApp(
      home: Body(),
    );
  }
}

class Body extends StatefulWidget {
  @override
  _BodyState createState() => _BodyState();
}

class _BodyState extends State<Body> {
  @override
  void initState() {
    super.initState();
    FacebookAudienceNetwork.init();
  }

  showInter() {
    FacebookInterstitialAd.loadInterstitialAd(
      placementId: "Your Placement ID",
      listener: (result, value) {
        if (result == InterstitialAdResult.LOADED)
          FacebookInterstitialAd.showInterstitialAd(delay: 2000);
      },
    );
  }

  @override
  Widget build(BuildContext context) {
    return Scaffold(
      appBar: AppBar(
        title: Text("Home"),
        centerTitle: true,
      ),
      bottomNavigationBar: FacebookBannerAd(
        bannerSize: BannerSize.STANDARD,
        keepAlive: true,
        placementId: "Your Placement ID",
      ),
      body: Center(
        child: Column(
          children: [
            Text("Facebook Audience Network Testing"),
            RaisedButton(
              onPressed: () {
                showInter();
              },
              child: Text("Show Interstitial Ad"),
            )
          ],
        ),
      ),
    );
  }
}
I hope this Flutter tutorial was helpful for you. If you are interested in learning Flutter, please check other Flutter tutorials on this site. Some of them have video tutorials included.
Happy mobile app development with Flutter 🙂!