In this tutorial, we are going to learn that how we can use AWS Lambda to store user data in Amazon RDS. This tutorial is divided into three parts.
- Creating database using Amazon RDS.
- Creating Spring Boot Application.
- Testing Lambda function.
We can refer to the following tutorials before going ahead.
- Build and deploy a Serverless Spring Boot Web Application with AWS Lambda
- AWS Lambda with Spring Boot – A Simple GreetMe Example
Let’s get started!
Creating database using Amazon RDS
First, we will log in to our AWS account then under the Services tab, we will click on RDS. On the top right, we will click on Create Database.
Create Database
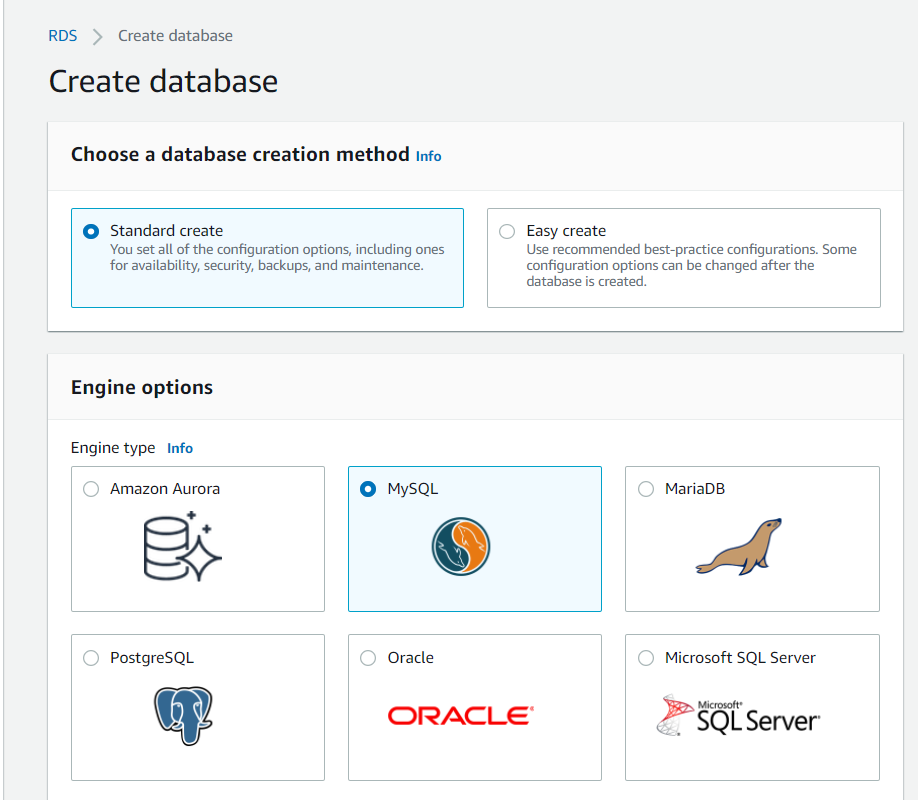
First, we will choose the database creation method. If we choose Standard create then we get the provision to set all the configuration options. On the other hand, if we choose Easy create we use recommended best-practice configurations. For this tutorial, we will choose Standard Create. Under Engine options, we will choose MYSQL.
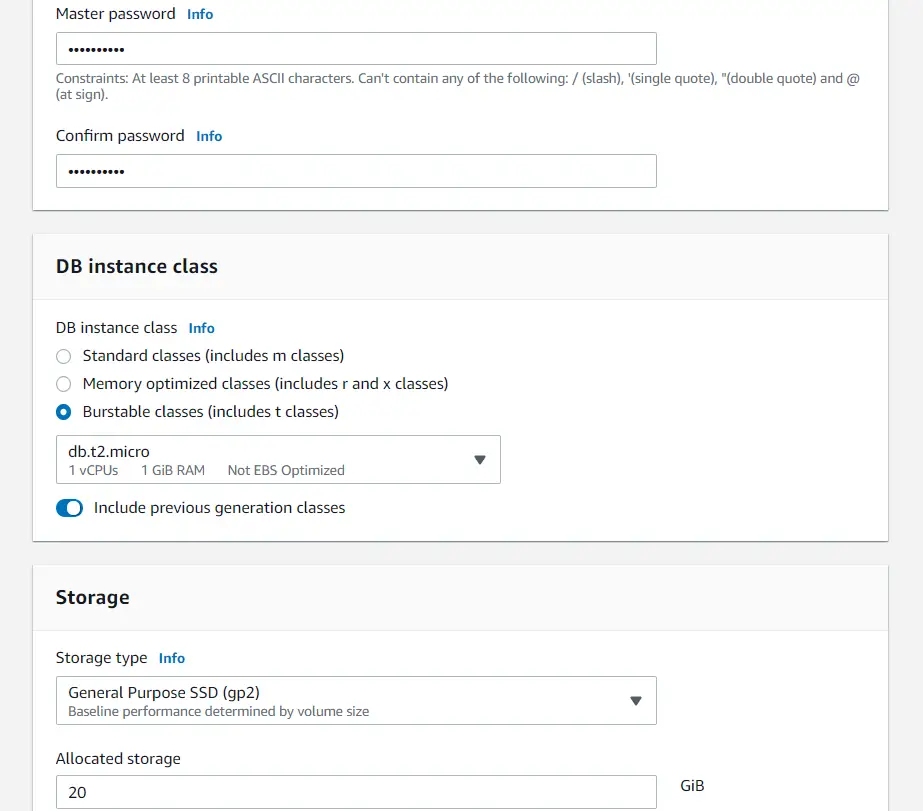
We will leave the Version value to be default i.e. MySQL 8.0.23. In Templates, we will choose Production but we will make sure that we remain under the free tier. Under Settings, we can set the name of our DB instance. Under Credentials Settings, we can set the Master username and password.

In the DB instance class we will select Burstable classes, then enable Include previous generation classes and then select db.t2.micro. For Storage type, we will select General Purpose SSD(gp2).
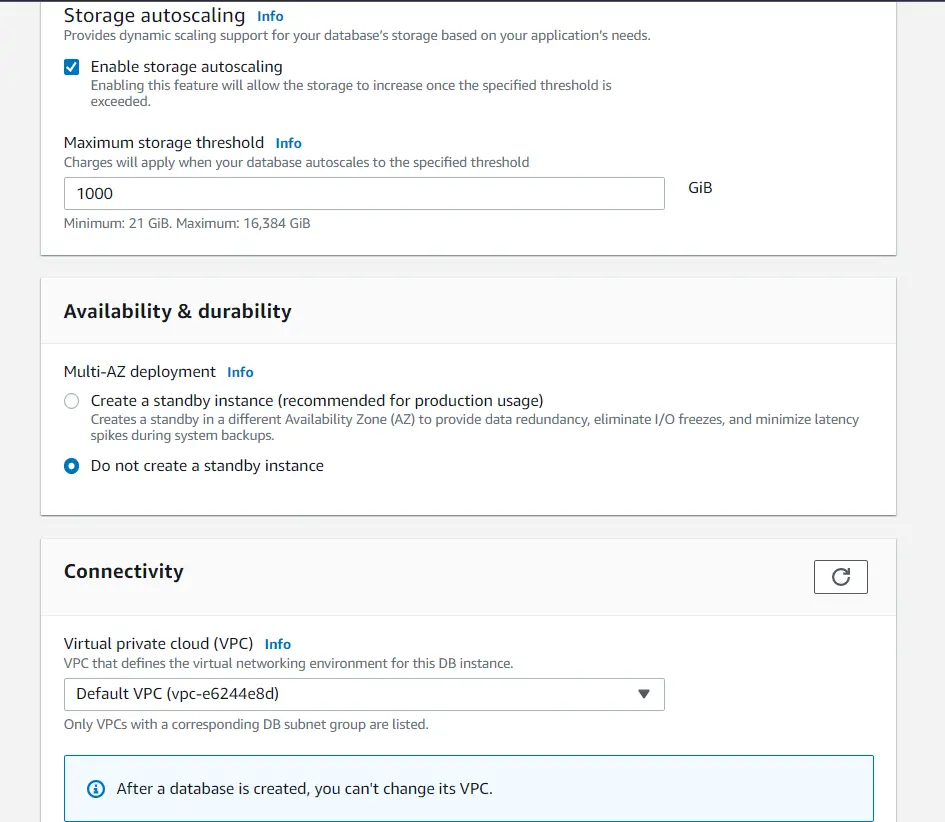
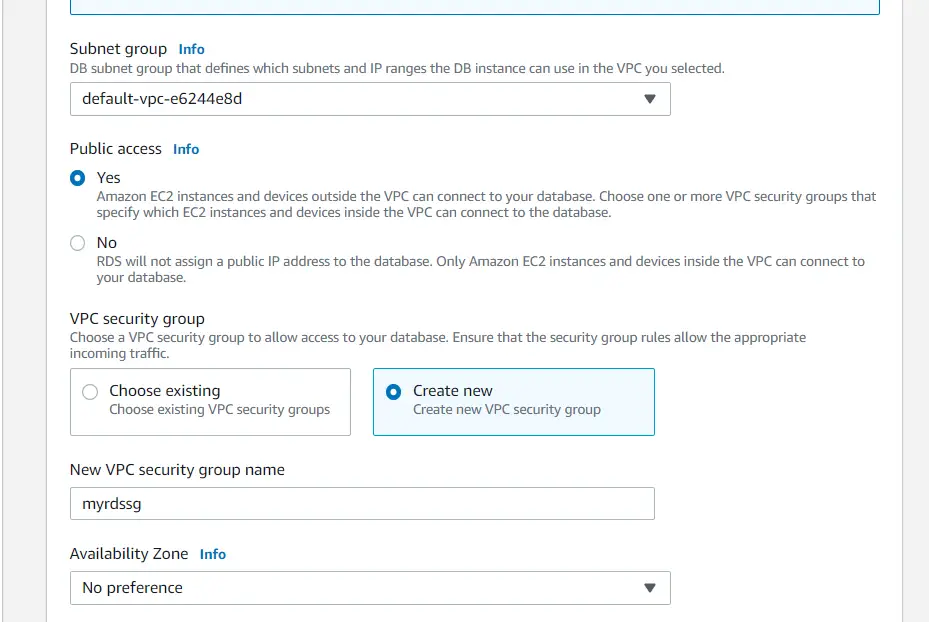
We will leave the other configurations in Storage to be default. Under Availability & Durability, we will select Do not create a standby instance for now. In Connectivity, we will leave the default VPC and Subnet group, and then we can make our database publicly accessible so that EC2 instances and devices outside the VPC can connect to our database. Now we will create a Security group to specify which EC2 instances and devices inside the VPC can connect to the database. We will provide the name of our newly created Security i.e myrdssg.
We have different authentication options available. For now, we will leave it to Password authentication.
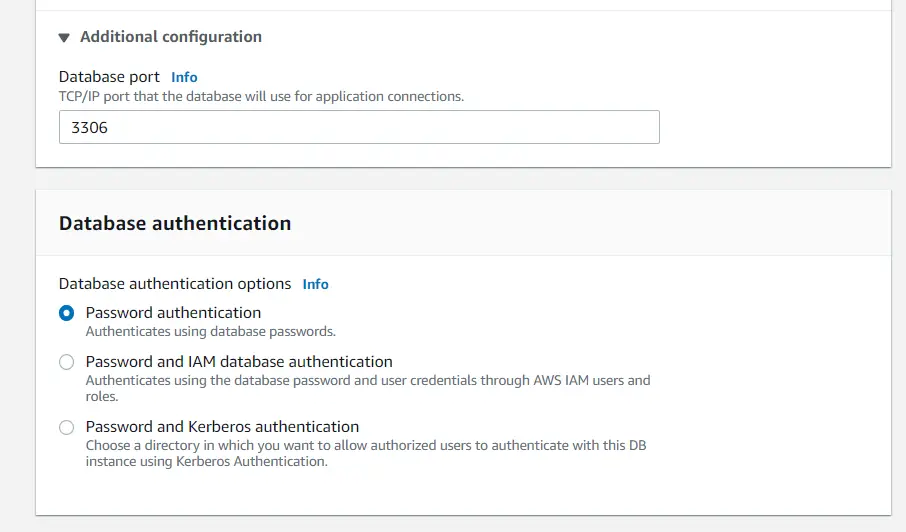
Then we can specify the additional configurations which include Database options, backup enabled, backtrack disabled, Enhanced Monitoring enabled, maintenance, CloudWatch Logs, delete protection enabled. For now, will only provide our Initial database name i.e. mylambdadb and leave the remaining configurations as it is. After that, we will click on Create Database.

We can check out the official website of AWS to learn more about RDS.
Security Group of RDS
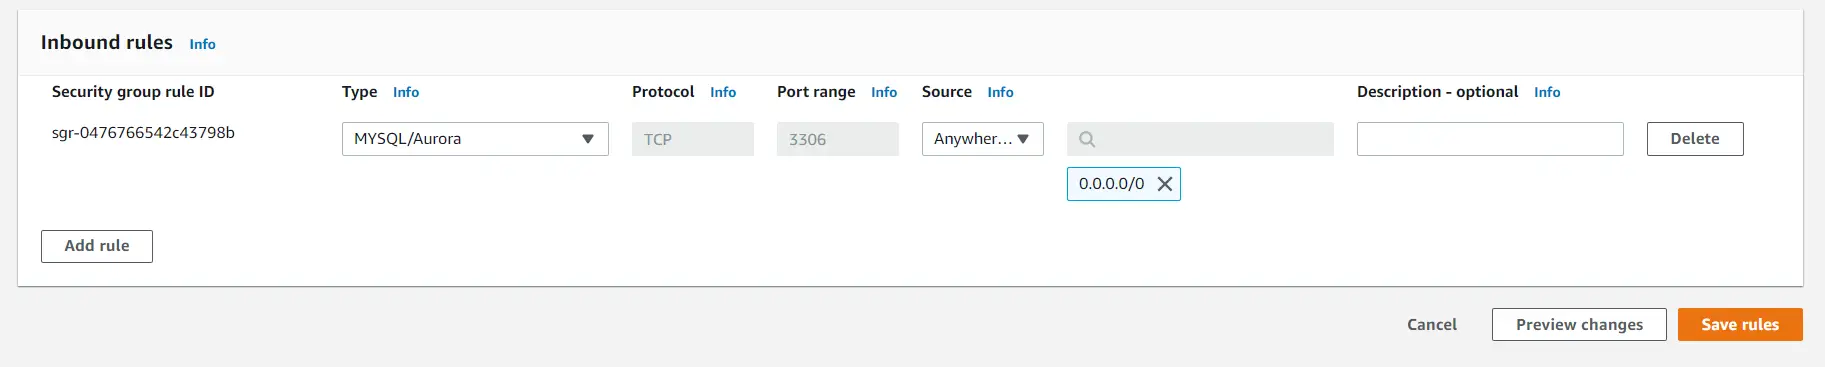
Now we will update the Inbound rules of our newly created Security Group named myrdssg. Note that when we will edit the Inbound rules, we will see that in Source it will have our PC’s public IP address enlisted. We can change the source from that IP address to Anywhere so that it can also be accessed by our lambda function.
MySQL Workbench
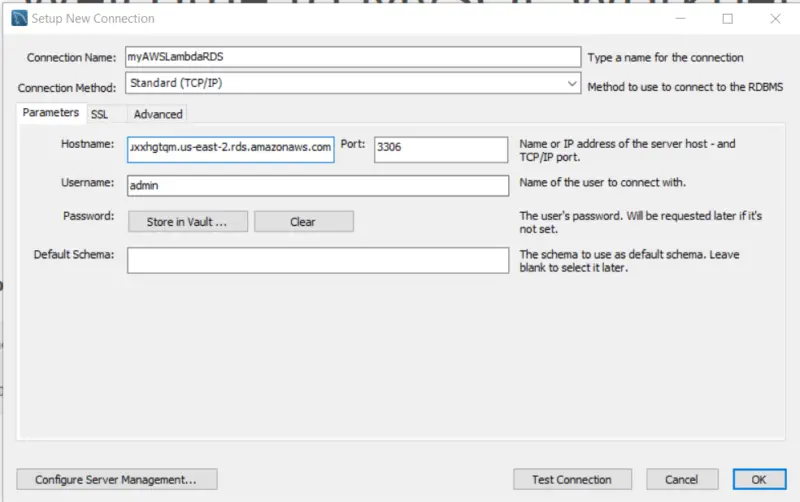
Since we made our database publicly accessible we can access it from our PC. We will set up a new connection in MySQL Workbench where we will provide the Connection Name, in our case we have set it to myAWSLambdaRDS. We will provide the hostname which is equal to the Endpoint value found in the description of the database under Connectivity and Security. Then we will provide our Username and Password that we set earlier.
Now we will create a table course with the following SQL script.
CREATE TABLE `course` (
  `id` int NOT NULL AUTO_INCREMENT,
  `code` varchar(255) DEFAULT NULL,
  `name` varchar(255) DEFAULT NULL,
  PRIMARY KEY (`id`)
) ENGINE=InnoDB AUTO_INCREMENT=8 DEFAULT CHARSET=utf8mb4 COLLATE=utf8mb4_0900_ai_ci;
Creating Spring Boot Application
pom.xml
Our pom.xml will remain the same as defined in this tutorial. The only difference is that we will also add the following dependency for MySQL.
<dependency>
   <groupId>mysql</groupId>
   <artifactId>mysql-connector-java</artifactId>
</dependency>
Course.java
public class Course {

    String name;
    String code;

    public String getName() {
        return name;
    }

    public void setName(String name) {
        this.name = name;
    }

    public String getCode() {
        return code;
    }

    public void setCode(String code) {
        this.code = code;
    }

}
Handler.java
In the Handler class, we will create a static block where we will create a connection to our database. The reason for keeping this code inside the static block is that the connection will be reused and we will not have to request for connection again and again. After that in the handler function, we will insert the data passed by the user to our database using the insert query. If everything goes well our function will return true otherwise it will return false.
import com.amazonaws.services.lambda.runtime.Context;
import com.amazonaws.services.lambda.runtime.RequestHandler;
import com.rds.aws.lambda.requests.Course;
import java.sql.Connection;
import java.sql.DriverManager;
import java.sql.SQLException;
import java.sql.Statement;
import java.util.logging.Logger;

public class Handler implements RequestHandler<Course, Boolean> {

    private Logger logger = Logger.getLogger(Handler.class.getName());

    static Connection connection;
    static {
        try {

            String username = System.getenv("dbUsername");

            String password = System.getenv("dbPassword");

            String URL = System.getenv("dbURL");

            connection = DriverManager.getConnection(URL, username, password);

        } catch (SQLException e) {

        }
    }

    @Override
    public Boolean handleRequest(Course input, Context context) {
        try {

            Statement stmt = connection.createStatement();
            stmt.executeUpdate("INSERT INTO mylambdadb.course (name,code) values('" + input.getName() + "','"
                    + input.getCode() + "')");

            return true;
        } catch (Exception e) {
            logger.info(e.getLocalizedMessage());
        }
        return false;
    }
}
Testing Lambda function
To learn how we can create a lambda function using a Spring Boot Application we can refer to the following tutorial. Now we will test our lambda function by posting a course object that includes fields name and code.
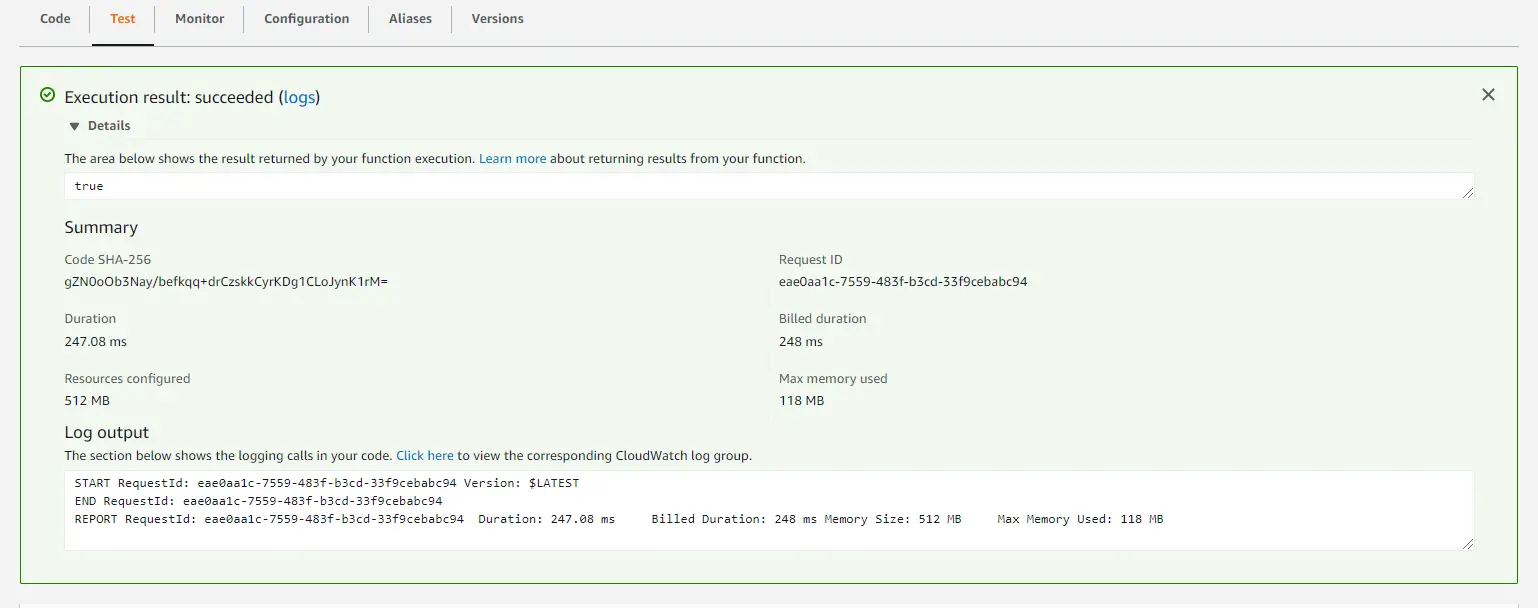
Here we can see the log output of our lambda function. The function has returned true which means that data has been successfully inserted into our database.
We can see that the record has been inserted into our database.
![]()
Conclusion
With this, we have come to the end of our tutorial. Here we have learned that how to use AWS Lambda to store user data in Amazon RDS which started from configuring Amazon RDS then we walked through the process of coding our Spring Boot Application that was supposed to be used as a lambda function. In the end, we uploaded our jar file and tested the function by passing the required input to the lambda function.
Stay tuned for more informative tutorials coming ahead. Feel free to give any feedback in the comments section.
Happy learning!