In this tutorial, we are going to see how to insert records into a DynamoDB table using an AWS Lambda function written using Spring Boot Java. We are also going to add an AWS API Gateway trigger to the Lambda function and see how it works. To follow this tutorial, make sure that you have an active AWS account. If you don’t go ahead and create one.
Database setup
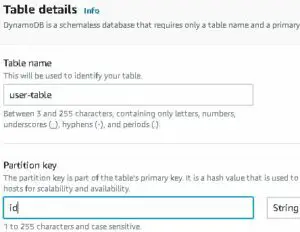
Before we begin with the Spring Boot application development, we need to create a DynamoDB table. We will be creating a table with the name user-table and insert user details like id, first_name, last_name, and email in the following steps.
Firstly, go to DynamoDB under the Database services in the AWS Management console. Click on Create table, give the name as user-table and id as the partition key with String data type. Click on Create table. The database is now ready to store records with id as the primary key. The second step is to create a Spring Boot application.
Creating Spring Boot Application
Secondly, create a Spring boot project and import the necessary maven dependencies into the pom.xml file.
Pom.xml
The below maven dependencies are required to create a Lambda function that connects to the DynamoDB table.
<dependency>
    <groupId>org.modelmapper</groupId>
    <artifactId>modelmapper</artifactId>
    <version>2.3.8</version>
</dependency>
<dependency>
    <groupId>com.github.derjust</groupId>
    <artifactId>spring-data-dynamodb</artifactId>
    <version>5.1.0</version>
</dependency>
<dependency>
    <groupId>org.springframework.cloud</groupId>
    <artifactId>spring-cloud-function-adapter-aws</artifactId>
</dependency>
<dependency>
    <groupId>com.amazonaws</groupId>
    <artifactId>aws-lambda-java-events</artifactId>
    <version>2.0.2</version>
</dependency>
<dependency>
    <groupId>com.amazonaws</groupId>
    <artifactId>aws-lambda-java-core</artifactId>
    <version>1.1.0</version>
</dependency>
<dependency>
    <groupId>com.amazonaws</groupId>
    <artifactId>aws-java-sdk-dynamodb</artifactId>
    <version>1.11.163</version>
</dependency>
After that, create a UserEntity class in the com.appsdeveloperblog.awslambda.model package. Annotate the class with @DynamoDBTable. Set the tableName value to the name of the DynamoDB table created in the first step i.e., user-table.
UserEntity.java
In this class, define all the attributes – id, first_name, last_name, and email. Since id is the primary key, we need to annotate the id variable declaration with @DynamoDBHashKey. Annotate the rest of the attributes with @DynamoDBAttribute. Set the attributeName value in the annotation with the column name you would like to have in the table. Also, include Getters and Setters for all the attributes in the class.
package com.appsdeveloperblog.awslambda.model;

import com.amazonaws.services.dynamodbv2.datamodeling.DynamoDBAttribute;
import com.amazonaws.services.dynamodbv2.datamodeling.DynamoDBHashKey;
import com.amazonaws.services.dynamodbv2.datamodeling.DynamoDBTable;

@DynamoDBTable(tableName = "user-table")
public class UserEntity {

    @DynamoDBHashKey
    private String id;
    @DynamoDBAttribute(attributeName = "first_name")
    private String first_name;
    @DynamoDBAttribute(attributeName = "last_name")
    private String last_name;
    @DynamoDBAttribute(attributeName = "email")
    private String email;

    public String getId() {
        return id;
    }

    public void setId(String id) {
        this.id = id;
    }

    public String getFirst_name() {
        return first_name;
    }

    public void setFirst_name(String first_name) {
        this.first_name = first_name;
    }

    public String getLast_name() {
        return last_name;
    }

    public void setLast_name(String last_name) {
        this.last_name = last_name;
    }

    public String getEmail() {
        return email;
    }

    public void setEmail(String email) {
        this.email = email;
    }
}
In the following step, create a UserRepository interface in the com.appsdeveloperblog.awslambda.repository package.
UserRepository.java
UserRepository extends the CrudRepository<UserEntity, String> and is annotated with @Repository.
package com.appsdeveloperblog.awslambda.repository;

import org.springframework.data.repository.CrudRepository;
import com.appsdeveloperblog.awslambda.model.UserEntity;
import org.springframework.stereotype.Repository;

@Repository
public interface UserRepository extends CrudRepository<UserEntity, String> {

}
Later, create a DynamoDB client that can be used to connect to the database and insert records.
DynamoDBClient.java
In the com.appsdeveloperblog.awslambda.config package, create DynamoDBClient class and define a Bean of type AmazonDynamoDB. AmazonDynamoDB uses BasicAWSCredentials that requires access key ID and secret access key for programmatic access of AWS resources. If you don’t have access keys, you can create them in the Security credentials tab of the User Summary under the IAM Service.
package com.appsdeveloperblog.awslambda.config;

import com.amazonaws.auth.AWSStaticCredentialsProvider;
import com.amazonaws.auth.BasicAWSCredentials;
import com.amazonaws.services.dynamodbv2.AmazonDynamoDB;
import com.amazonaws.services.dynamodbv2.AmazonDynamoDBClientBuilder;
import com.appsdeveloperblog.awslambda.repository.UserRepository;
import org.springframework.beans.factory.annotation.Value;
import org.springframework.context.annotation.Bean;
import org.springframework.context.annotation.Configuration;
import org.socialsignin.spring.data.dynamodb.repository.config.EnableDynamoDBRepositories;

@Configuration
@EnableDynamoDBRepositories(basePackageClasses = UserRepository.class)
public class DynamoDBClient {

    @Value("${aws.auth.accessKeyId}")
    private String accessKeyId;

    @Value("${aws.auth.secretAccessKey}")
    private String secretAccessKey;

    @Value("${aws.auth.region}")
    private String region;

    @Bean
    public AmazonDynamoDB amazonDynamoDB() {
        final BasicAWSCredentials basicAWSCredentials = new BasicAWSCredentials(accessKeyId, secretAccessKey);
        return AmazonDynamoDBClientBuilder
                .standard()
                .withRegion(region)
                .withCredentials(new AWSStaticCredentialsProvider(basicAWSCredentials))
                .build();
    }

}
Afterward, define a UserRequest class with attributes first_name, last_name, and email.
UserRequest.java
This class defines the POST request body format. We also need to define Getters and Setters in this class.
package com.appsdeveloperblog.awslambda.request;

public class UserRequest {


    private String first_name;
    private String last_name;
    private String email;

    public String getFirst_name() {
        return first_name;
    }

    public void setFirst_name(String first_name) {
        this.first_name = first_name;
    }

    public String getLast_name() {
        return last_name;
    }

    public void setLast_name(String last_name) {
        this.last_name = last_name;
    }

    public String getEmail() {
        return email;
    }

    public void setEmail(String email) {
        this.email = email;
    }
}
Next, define APIGatewayRequest class in the com.appsdeveloperblog.awslambda.request package and define httpMethod and userRequest attributes in the class. Also, generate Getters and Setters for both the attributes.
APIGatewayRequest.java
This class is required to accept specific formatted requests from the AWS API Gateway. Copy the below contents into the APIGatewayRequest.java file.
package com.appsdeveloperblog.awslambda.request;

public class APIGatewayRequest {

    private String httpMethod;
    private UserRequest userRequest;

    public String getHttpMethod() {
        return httpMethod;
    }

    public void setHttpMethod(String httpMethod) {
        this.httpMethod = httpMethod;
    }

    public UserRequest getUserRequest() {
        return userRequest;
    }

    public void setUserRequest(UserRequest userRequest) {
        this.userRequest = userRequest;
    }
}
After that, create a Spring Cloud Function named CreateUserFunction that implements the actual business Logic. The CreateUserFunction implements the Function<APIGatewayRequest,UserEntity> functional interface. We need to override the apply() method. In this method, the userRequest extracted from the APIGatewayRequest is mapped to UserEntity and saved into the repository.
CreateUserFunction.java
In this function, we generate a random UUID and assign it as the id to the UserEntity before inserting the record into the database.
package com.appsdeveloperblog.awslambda.functions;

import com.appsdeveloperblog.awslambda.model.UserEntity;
import com.appsdeveloperblog.awslambda.repository.UserRepository;
import com.appsdeveloperblog.awslambda.request.APIGatewayRequest;
import org.modelmapper.ModelMapper;
import org.modelmapper.convention.MatchingStrategies;
import org.springframework.beans.factory.annotation.Autowired;
import org.springframework.stereotype.Component;

import java.util.UUID;
import java.util.function.Function;

@Component
public class CreateUserFunction implements Function<APIGatewayRequest,UserEntity> {

    @Autowired
    private UserRepository userRepository;

    @Override
    public UserEntity apply(APIGatewayRequest userRequest) {
        ModelMapper modelMapper = new ModelMapper();
        modelMapper.getConfiguration().setMatchingStrategy(MatchingStrategies.STRICT);
        UserEntity userEntity = modelMapper.map(userRequest.getUserRequest(), UserEntity.class);
        userEntity.setId(UUID.randomUUID().toString());
        userRepository.save(userEntity);
        return userEntity;
    }
}
After that, create a MyLambdaFunctionHandler class that accepts the requests sent to the Lambda function.
MyLambdaFunctionHandler.java
This class extends the SpringBootRequestHandler class. Leave the class empty as the logic is already defined in the Spring Cloud Function.
package com.appsdeveloperblog.awslambda;

import com.appsdeveloperblog.awslambda.request.APIGatewayRequest;
import org.springframework.cloud.function.adapter.aws.SpringBootRequestHandler;

public class MyLambdaFunctionHandler extends SpringBootRequestHandler<APIGatewayRequest,Object> {
}
Lastly, define the necessary fields in the application.properties file.
application.properties
Define the aws access keys, region, and spring.cloud.function.scan.packages property as shown below.
aws.auth.accessKeyId=<access-key-id>
aws.auth.secretAccessKey=<secret-key>
aws.auth.region=<region>
spring.cloud.function.scan.packages=com.appsdeveloperblog.awslambda.functions
Deploying the application on AWS Lambda
Once the Spring Boot application is ready, create an executable file by running the maven package command and deploy it as a Lambda function. Set the handler to com.appsdeveloperblog.awslambda.MyLambdaFunctionHandler. If you don’t know how to create a Lambda function from the jar file, check out this tutorial.
Build and deploy a Serverless Spring Boot Web Application with AWS Lambda
Adding API Gateway Trigger
Under the Networking & Content Delivery Services, click on API Gateway. Then click on Create API, Rest API -> Build. Give a name to the API and click on Create.
Next, click on Actions beside the resources tab ad select Create Resource. Give the resource name as users and click on Create Resource.
After that, under the /users resource, create a POST method by clicking on Actions -> Create Method. Specify the name of the Lambda function we created in the previous step and click on Save.
In the Method execution chart of the POST request, click on Integration Request and add the mapping template as follows.
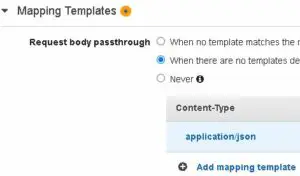
Generate Template
#set($inputRoot = $input.path('$'))
{
"httpMethod":"$context.httpMethod",
"userRequest":$input.json('$')
}
Click on Save. Then, deploy the API by clicking on Actions -> Deploy API.
Finally, after the deployment is complete, paste the Invoke URL into Postman and hit a POST request as shown below.
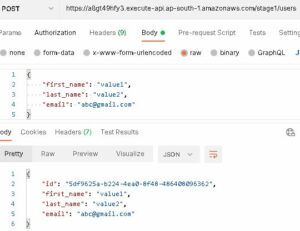
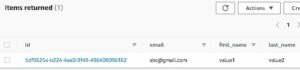
In the end, verify whether the Lambda function is invoked or not. Go to DynamoDB, select user-table, and click on View Items. You can see a new record in the database as shown below.
That’s it for this tutorial. Stay tuned for the upcoming tutorial on how to fetch records from the DynamoDB table based on id.